Start typing to search...
Tutorials
Creating games on Koji
5. Adding remix options
Search
Adding remix options
In the previous section of the remixable game tutorial, you finished adding the main functionality for a falling objects game. But, there’s more to do to get the most from Koji.
In this section, you’ll make the game easily remixable by other people so it can be shared everywhere online.
By the end of this section, you should feel comfortable:
-
Editing the remix menu in the game template.
-
Adding a customizable image to the menu.
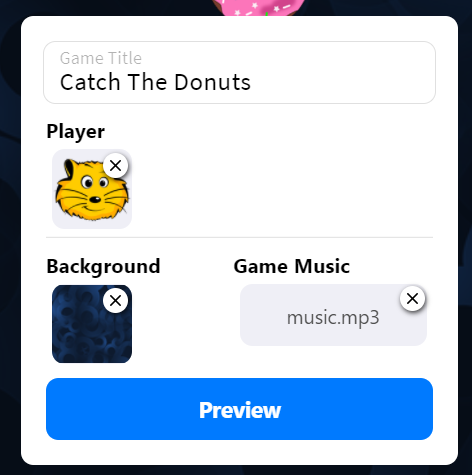
Exploring the remix menu
The game template provides a configurable remix menu to speed up game development on Koji.
If you open frontend/src/Components/Remix/index.js, you’ll see that some of the workflow you need for your game is already set up.
|
Note
|
To see what the remix menu currently looks like, use the Remix tab of the Debugger or the Live Preview in the Koji editor. |
The background image and music customizations are already handled by the template, so you can just leave them as they are.
Because you added the player functionality to the existing Player class, which already uses imgPlayer for its image, the player is also set up to be customizable.
To test it out, try changing the player image. If necessary, refresh the preview. The player is different now!
Adding collectibles to the remix menu
You can make the collectible image customizable, as well.
Setting up state hooks
First, make a state hook that will represent the collectible image, and assign the initial value.
Modify index.js as follows.
...
const Component = () => {
    ...
    const [imgCollectible, setImgCollectible] = useState("");
    const [isCollectibleInvalid, setIsCollectibleInvalid] = useState("");
    ...

    const assignInitialValues = () => {
        const remixValues = Koji.remix.get();
        ...

        setImgCollectible(remixValues.imgCollectible);

        ...
    })
}
Notice that you also created an isCollectibleInvalid state hook.
You’ll use this hook to make sure the user has actually uploaded an image, so the game won’t be published without one.
Also notice the change to the assignInitialValues() function, which is in the useEffect hook that runs when the Remix component mounts.
Here, you assigned the initial value from koji.json.
Changing the image
You also need to define functions for changing or deleting the collectible image.
...
const Component = () => {
    ...

    const changeCollectible = async () => {
        const imageUrl = await Koji.ui.capture.image();
        if (!imageUrl || imageUrl === "") return;

        setImgCollectible(imageUrl);
        setIsCollectibleInvalid(false);
        await Koji.remix.set({ imgCollectible: imageUrl })
        updateGame();
    }

    const deleteCollectible = async () => {
        setImgCollectible("");
        await Koji.remix.set({ imgCollectible: "" })
        updateGame();
    }

    ...
}
In changeCollectible, the code uses the Koji.ui.capture.image() method from the @withkoji/core package to capture the image.
This method lets users select an image by uploading it, pasting it from a link, or selecting it from the asset packs.
It will return null if the user cancels image selection, so the code includes a simple check to make sure that’s not the case.
Then, the code does the following:
-
Updates the
imgCollectiblestate hook with the resulting image. -
Resets the
isCollectibleInvalidstate hook. -
Updates the
imgCollectibleremix value with the resulting image. -
Updates the game.
This code updates the game because the user has a running game preview behind the remix menu. If you change a remix value that isn’t instantly previewable in the game, this step can be skipped.
In deleteCollectible(), the code works similarly, except it sets imgCollectible to an empty string instead of capturing an image.
Rendering the image component
Next, you need to render the component that represents a collectible image in the remix menu to enable users customize the image.
You can once again use the existing structure from Player.
Find the component that looks like the following.
<div>
    <Label>
        <b>{"Player"}</b>
    </Label>
    <ImageButton
        src={optimizeImage(imgPlayer, 120, 120)}
        canDelete={canUpdateImages}
        onClick={changeImgPlayer}
        onDelete={deletePlayer}
        isInvalid={isPlayerInvalid}
    />
</div>
Make a copy just below it, in the same <Section> component.
Modify the copy as follows.
<div>
    <Label>
        <b>{"Collectible"}</b>
    </Label>
    <ImageButton
        src={optimizeImage(imgCollectible, 120, 120)}
        canDelete={canUpdateImages}
        onClick={changeCollectible}
        onDelete={deleteCollectible}
        isInvalid={isCollectibleInvalid}
    />
</div>
Making sure the image is selected
Lastly, you need to modify the finish() function to prevent the user from publishing if they haven’t uploaded an image.
That logic is already in place for imgPlayer, so you can just modify it to include imgCollectible as follows.
const finish = async () => {
    if (imgPlayer === "" || imgCollectible === "") {
        setErrorLabel("Complete the required selections to continue.");

        if (imgPlayer === "") {
            setIsPlayerInvalid(true);
        }

        if (imgCollectible === "") {
            setIsCollectibleInvalid(true);
        }

        return;
    }

    await Koji.remix.set({
        backgroundImage,
        music,
        title,
    })
    Koji.remix.finish();
}|
Note
|
You don’t need to explicitly set imgPlayer and imgCollectible in the Koji.remix.set() function because you’ve already done it in the onChange handlers.
|

Wrapping up
You’ve just added the ability for users to change the collectible image. The remix menu is complete!
In the next section, you will customize the preview image that is displayed when sharing the game.