import React from 'react';
import styled from 'styled-components';
import Koji from '@withkoji/core'
import NavigateNextIcon from '@material-ui/icons/NavigateNext'
import optimizeImage from '../../Utils/optimizeImage';

const Container = styled.div`
    position: absolute;
    width: 100vw;
    height: 100vh;
    left: 0;
    top: 0;
    background-color: rgba(0,0,0,0.35);
    opacity: 0;
    overflow: hidden;
    z-index: 3;
    color: #FFFFFF;
    animation: fade-in 0.5s ease both;
    display: flex;
    justify-content: center;
    align-items: center;
`;

const Wrapper = styled.div`
    position: relative;
    min-width: 350px;

    background-color: #007AFF;
    background-size: cover;
    background-position: 50% 50%;
    background-repeat: no-repeat;
    box-shadow: 0px 15px 30px rgba(0, 0, 0, 0.2);
    padding: 30px;
    padding-top: 16px;
    border-radius: 35px 35px;

    animation: fade-in-slide-bottom 0.5s 0.25s ease both;
`;

const Title = styled.div`
    margin-bottom: 20px;
    font-size: 32px;
    font-weight: 800;
    text-align: center;
    user-select: none;
    white-space: pre-wrap;
`;

const Button = styled.button`
    position: relative;
    width: 100%;
    height: 64px;
    max-width: 500px;
    min-height: 64px;
    background-color: #FFFFFF;
    color: #007AFF;
    display: flex;
    justify-content: space-between;
    align-items: center;
    padding: 0 24px;
    font-size: 18px;
    font-weight: bold;
    border: 0;
    border-radius: 20px;
    outline: none;
    transition: all 0.1s ease;
    font-family: inherit;
    box-shadow: 0px 12px 20px rgba(0, 0, 0, 0.1);
    cursor: pointer;
    margin: 15px auto;
    user-select: none;

    &:active{
        transform: translateY(4px);
    }

    svg{
        font-size: 28px;
    }

    &:hover{
        background-color: rgba(240, 240, 255, 1);
    }
`;

const LifeLabel = styled.div`
    display: flex;
    align-items: center;
`;

const LifeIcon = styled.img`
    width: 24px;
    height: 24px;
    object-fit: contain;
    margin-right: 4px;
`;

const PaymentDialog = (props) => {
    const {
        onPurchase,
        onPurchaseCancel
    } = props;

    const remixValues = Koji.remix.get();
    const price = Number(remixValues.price).toFixed(2);
    const lifeIcon = optimizeImage(remixValues.imgLife, 64, 64);

    return (
        <Container >
            <Wrapper>
                <Title>
                    {`GAME OVER`}
                </Title>
                <Button
                    onClick={onPurchase}
                >
                    <LifeLabel>
                        <LifeIcon src={lifeIcon} />
                        {"Get Extra Lives"}
                    </LifeLabel>
                    <div>{`$${price}`}</div>
                </Button>

                <Button
                    style={{ marginBottom: `0` }}
                    onClick={onPurchaseCancel}
                >
                    <div>{"View Leaderboard"}</div>
                    <NavigateNextIcon />
                </Button>
            </Wrapper>
        </Container>
    )
}

export default PaymentDialog;Start typing to search...
Tutorials
Creating games on Koji
2. Creating a payment menu
Search
Creating a payment menu
In the previous section of the in-game purchases tutorial, you set up the product and price information for extra lives. In this section, you’ll create the Payment Menu UI component, which provides players the option to purchase more lives when they run out.
By the end of this section, you should feel comfortable:
-
Defining a new UI component.
-
Rendering the new component in the game.
Defining the UI component
Go to frontend/src/Components/View, and create a new file called PaymentDialog.js.
Copy the following code into your file.
This code creates a simple menu with two buttons. The menu looks like this example.
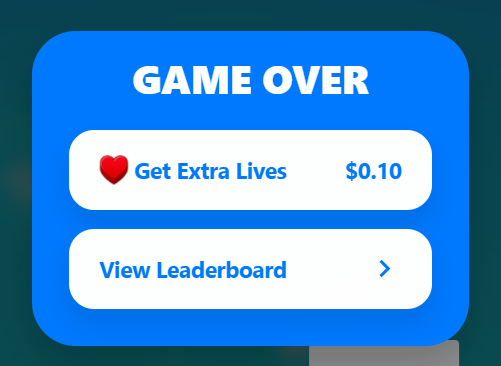
As you can see from the above code, you’ll be passing two functions into the PaymentDialog component — onPurchase and onPurchaseCancel.
These functions are called when the user clicks the corresponding buttons on the form.
You’ll add them to the game in the next section.
Notice that the code retrieves the price from the remix values in koji.json and displays it on the top button.
Rendering the component
Open frontend/src/Components/View/index.js.
Create a state hook that controls when the game displays the PaymentDialog component, and add the component to the Container object.
...
import PaymentDialog from './PaymentDialog'

...

const Component = (props) => {
    ...

    // Create a state hook to control display of PaymentDialog
    const [showPaymentDialog, setShowPaymentDialog] = useState(false);

    ...

    return(
        <Container>
            ...

            {showPaymentDialog &&
                <PaymentDialog />
            }
        </Container>
    )

}
Wrapping up
In this section, you created a payment menu and added it into your main component.
In the next section, you’ll write functions to handle the payment logic.