
Start typing to search...
Your first Koji app
As in most development projects, a Koji project is the collection of source code and assets that are compiled and packaged to create a Koji app. In this topic, you will walk through creating your first project by forking an existing one, making minor edits, and then publishing the app.
In this section, you will learn how to:
-
Fork an existing project.
-
Open the code editor to view the code in your project and make minor edits.
-
Compile and publish the app from the code editor.
-
Reopen the project for additional editing.
Forking an existing project
Koji is designed with the idea that any new technology is built on other existing technologies.
Koji developers start by forking an existing project or scaffold. In version control solutions, such as Git, forking means copying the contents of an entire repository to a new repository, which becomes the starting point for a different project. You can fork other developers' projects or your own.
When you fork a Koji project, you create a copy that you own. In your copy, you can change the code, reorganize components, and even remove parts that you don’t want.
In this tutorial, you will fork a scaffold. Scaffolds are bare-bones projects that include a basic JavaScript framework, as well as the instructions that Koji needs to run the project.
Exercise 1.1: Fork the scaffold
-
Go to the Koji App Store listing for the Developer Quick Start scaffold.
-
Fork the project by expanding the ellipses menu (…) and selecting Fork.
The scaffold is copied to a new project, and the Project Details page for the new project is shown.
Updating the project details
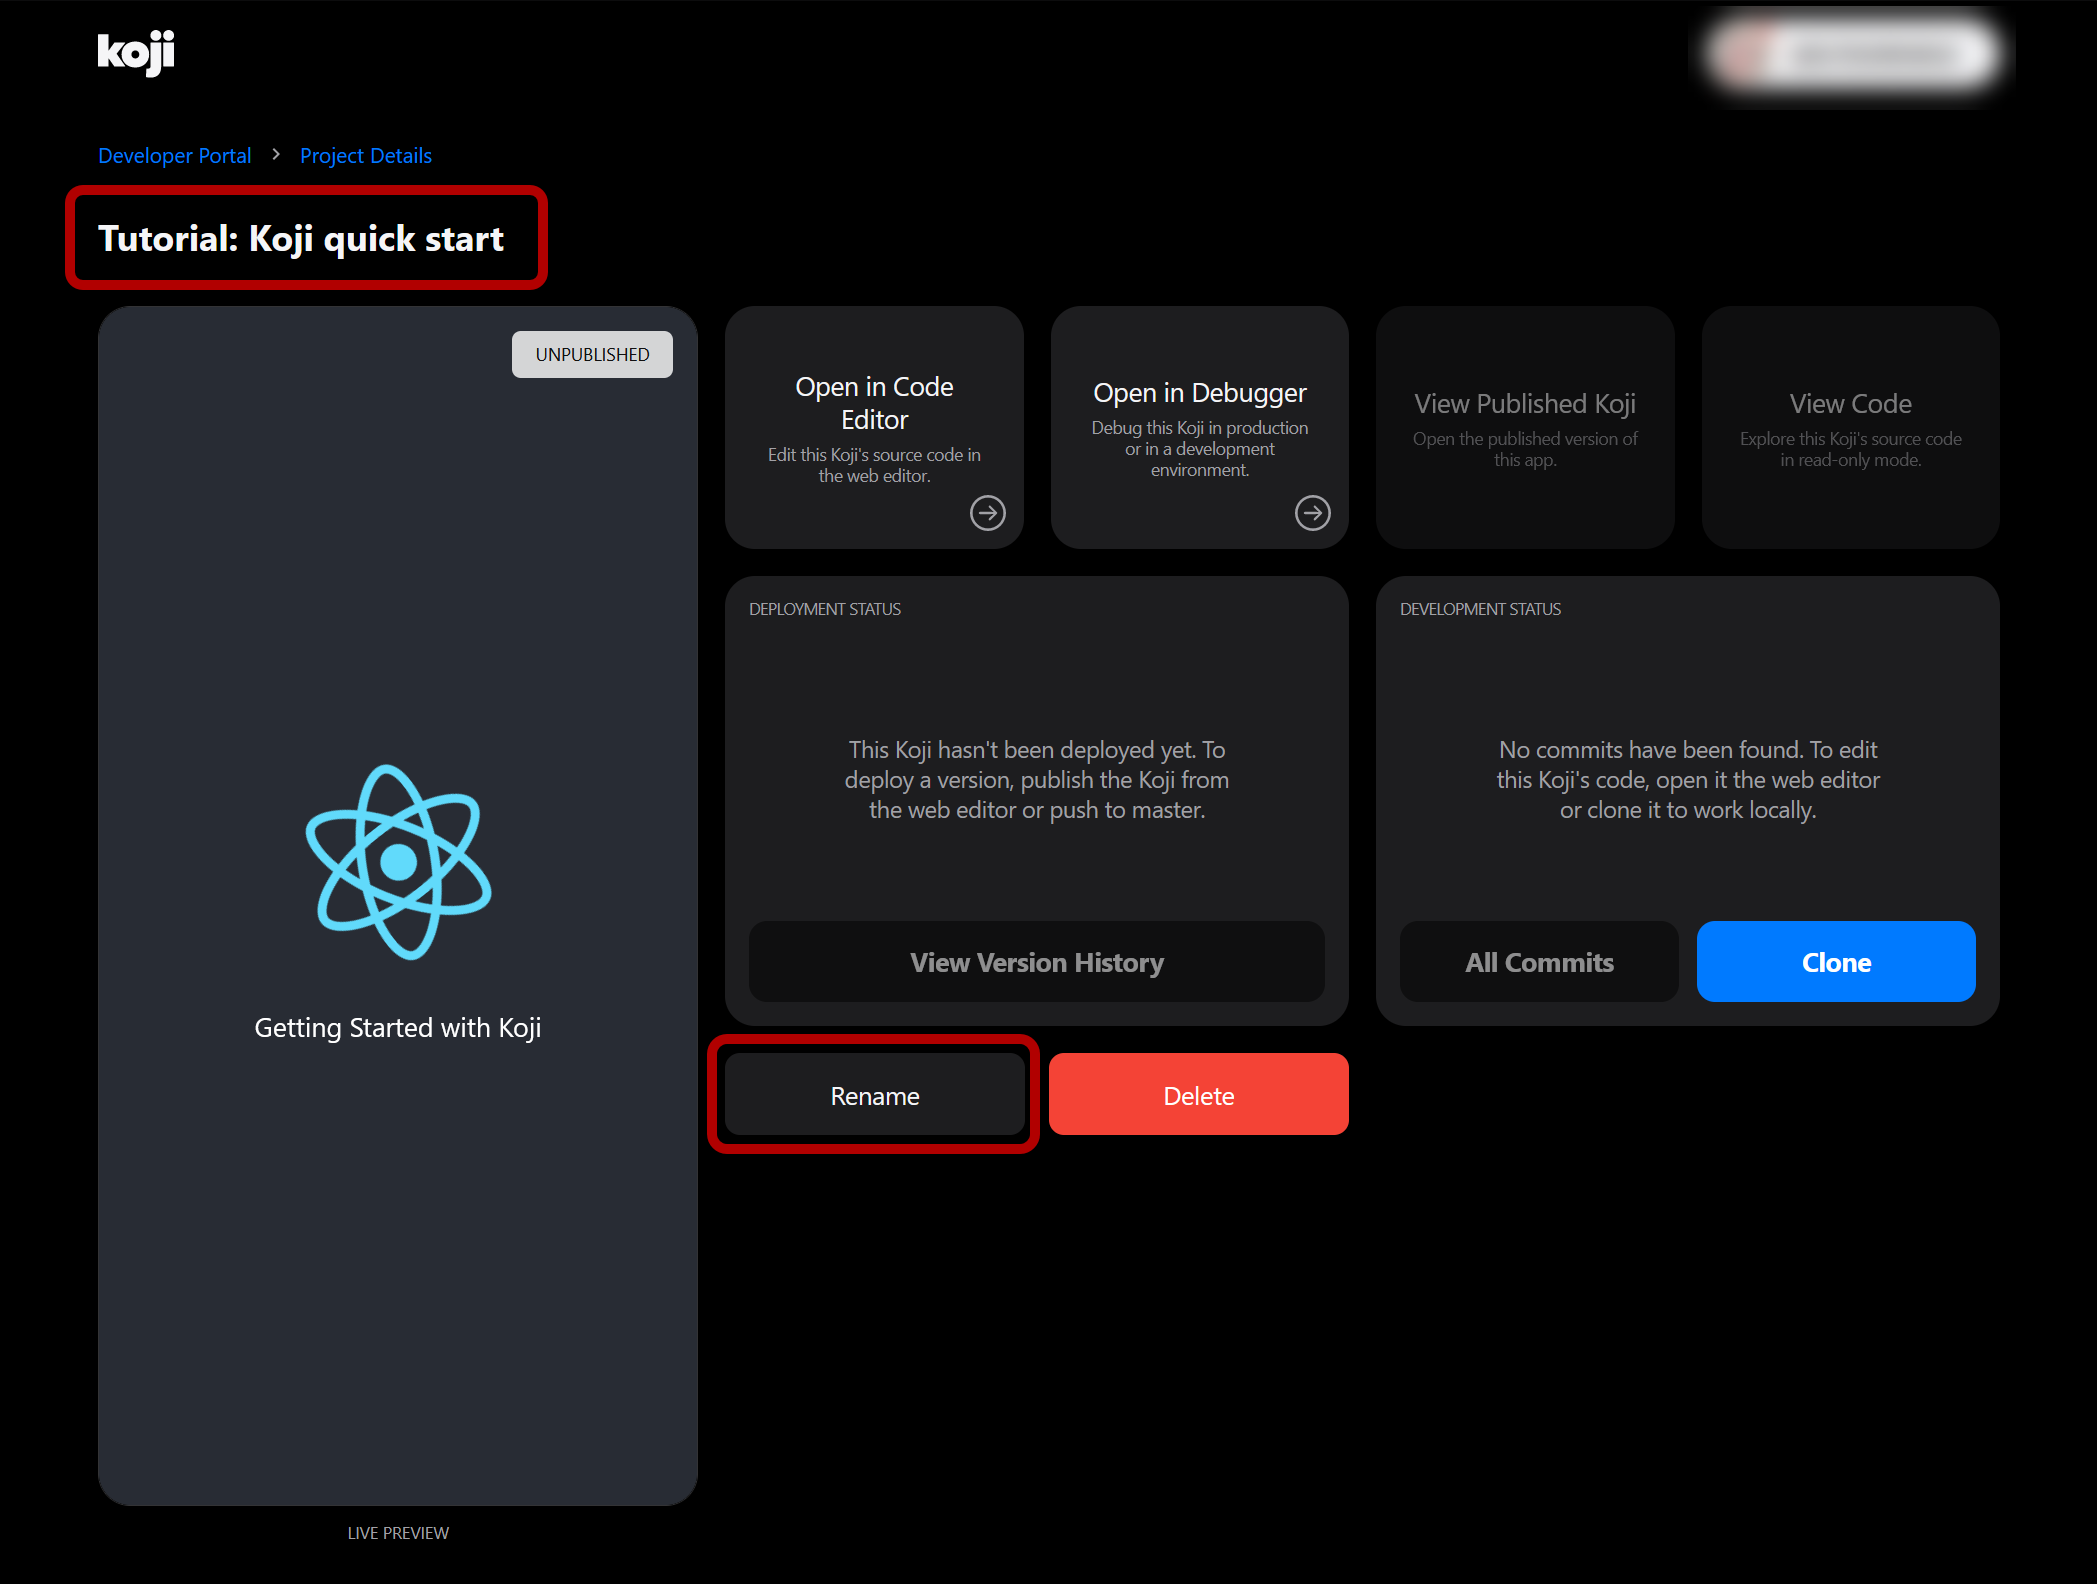
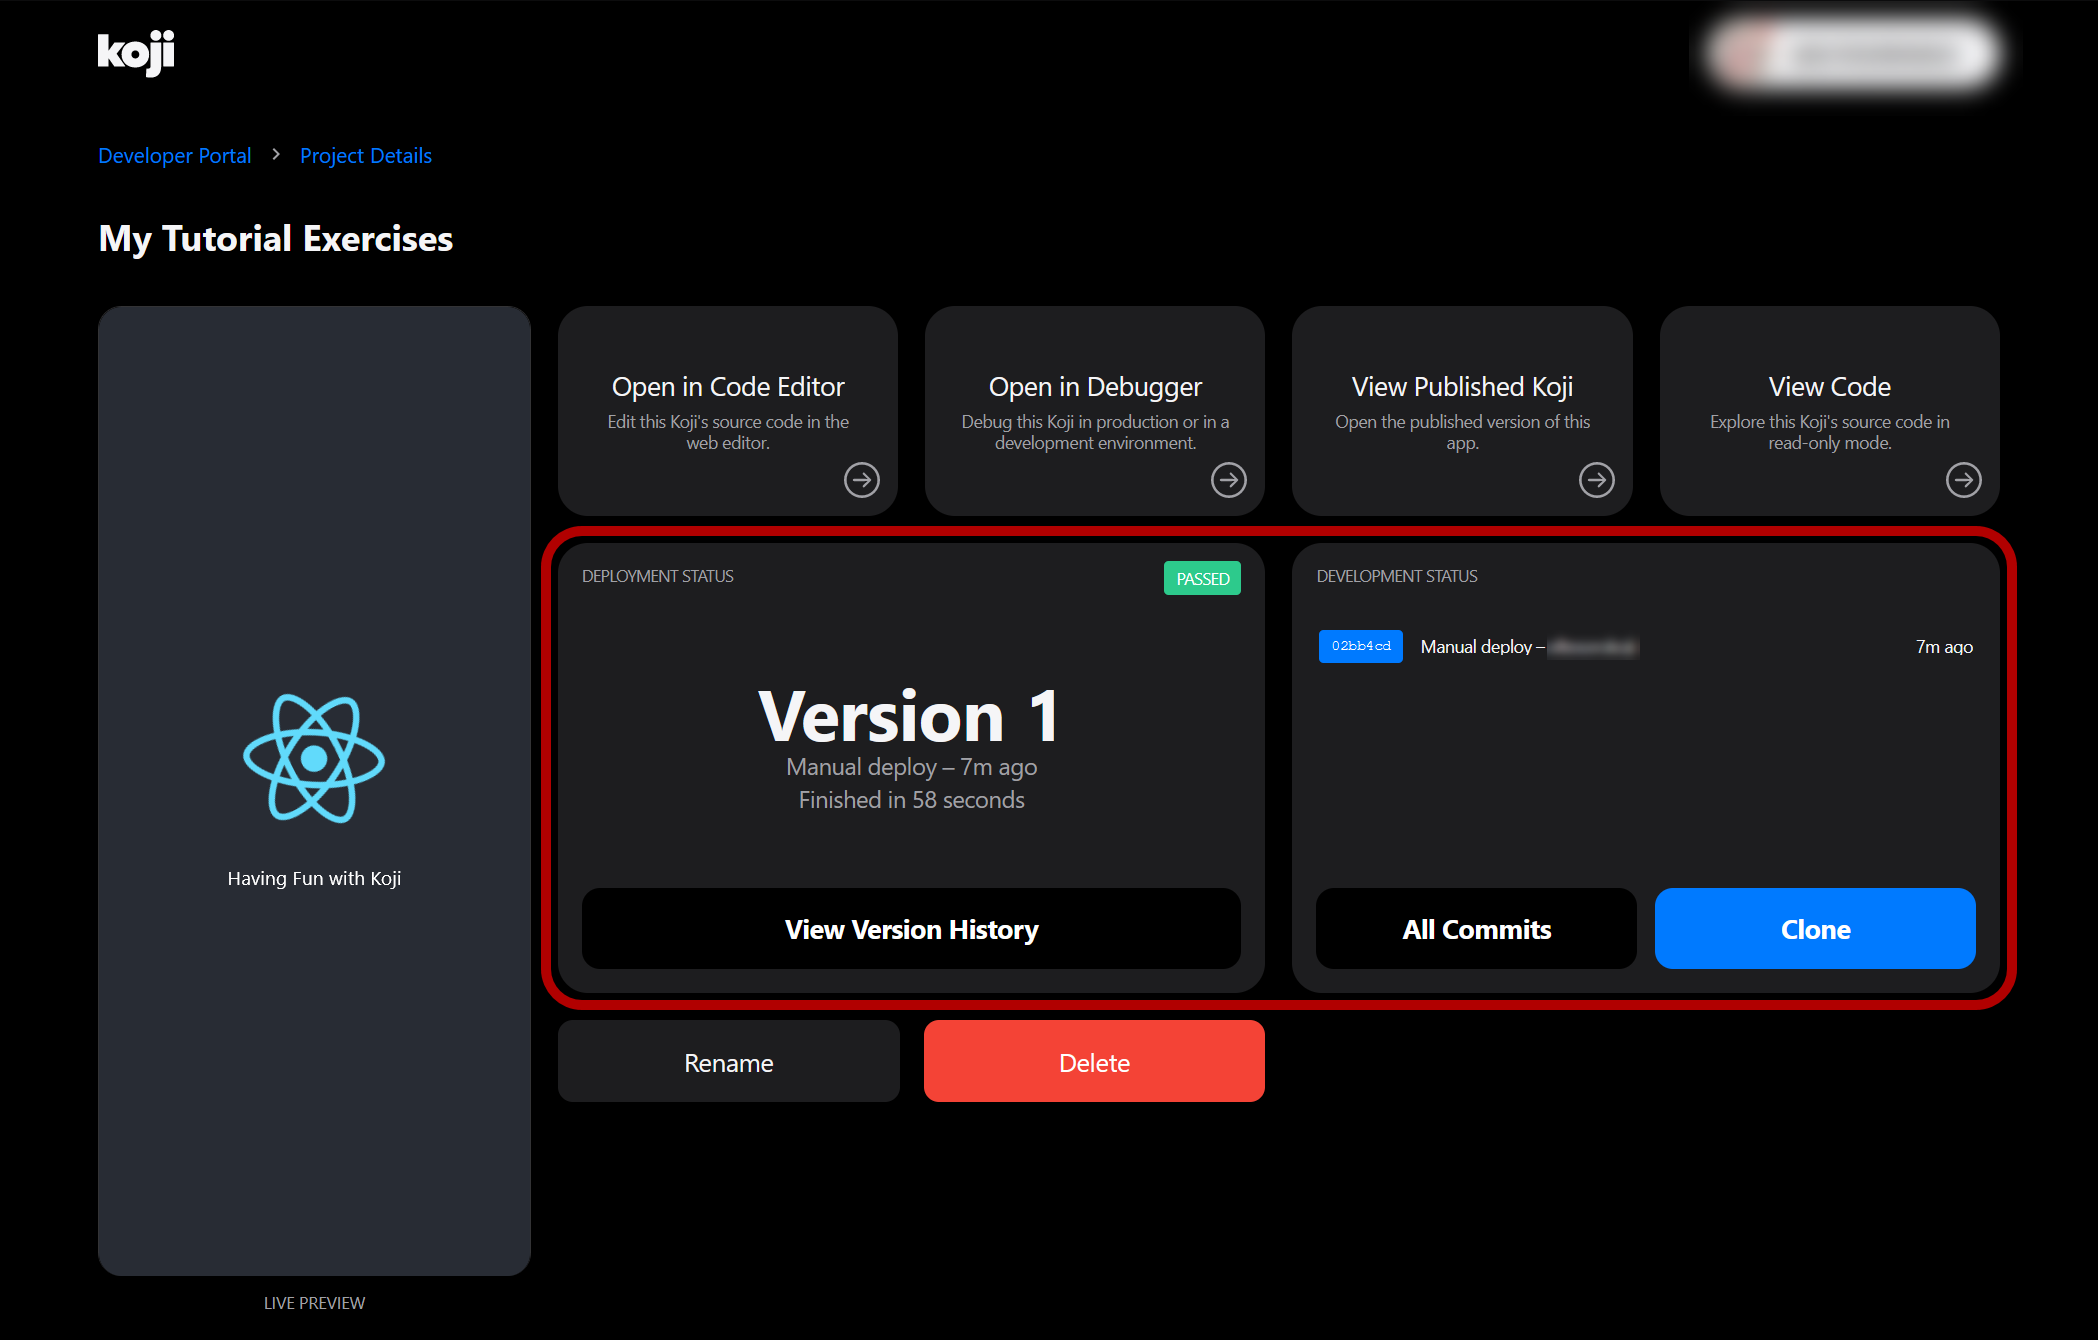
The Project Details page displays information about your project and provides advanced tools and configuration options.
Notice that your new project is initially given the same name as the original scaffold project. Customize your project by renaming it.
Exercise 1.2: Rename the new project
-
To rename your project, click Rename.
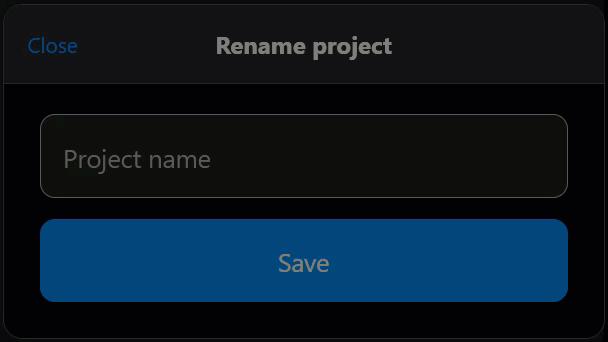
-
In the modal, fill in the Project Name field.
-
Click Save.
The project name changes to the name you entered.
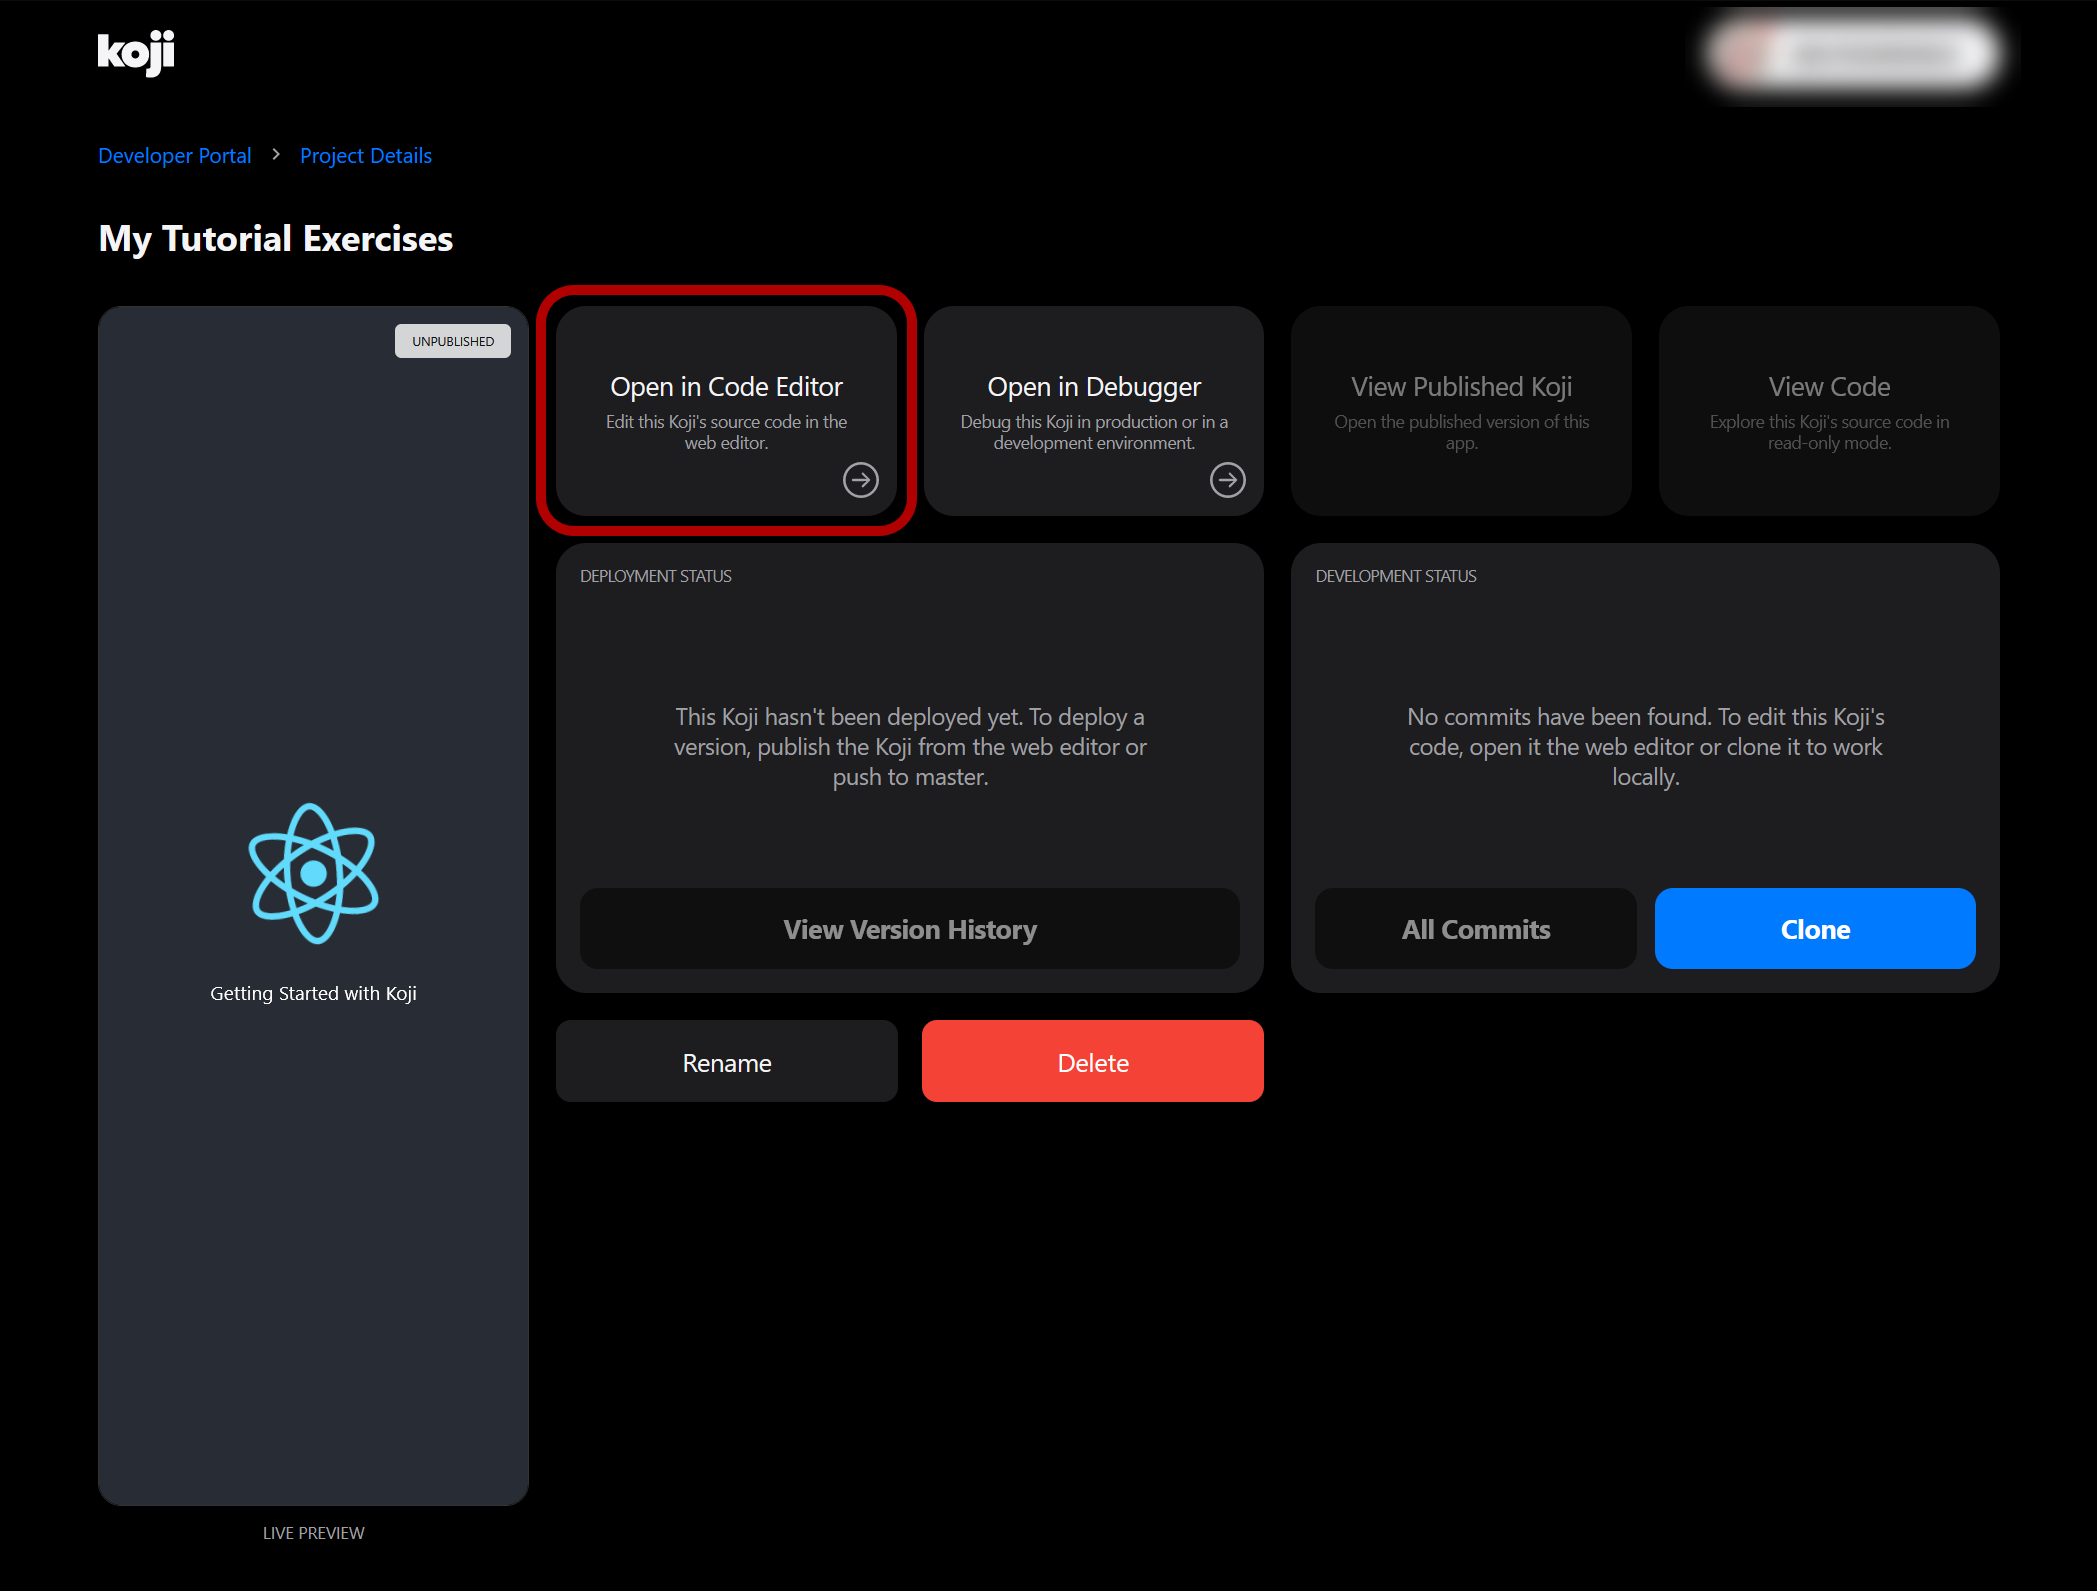
Exercise 1.3: Open the code editor
-
In the Project Details page, click Open in Code Editor.
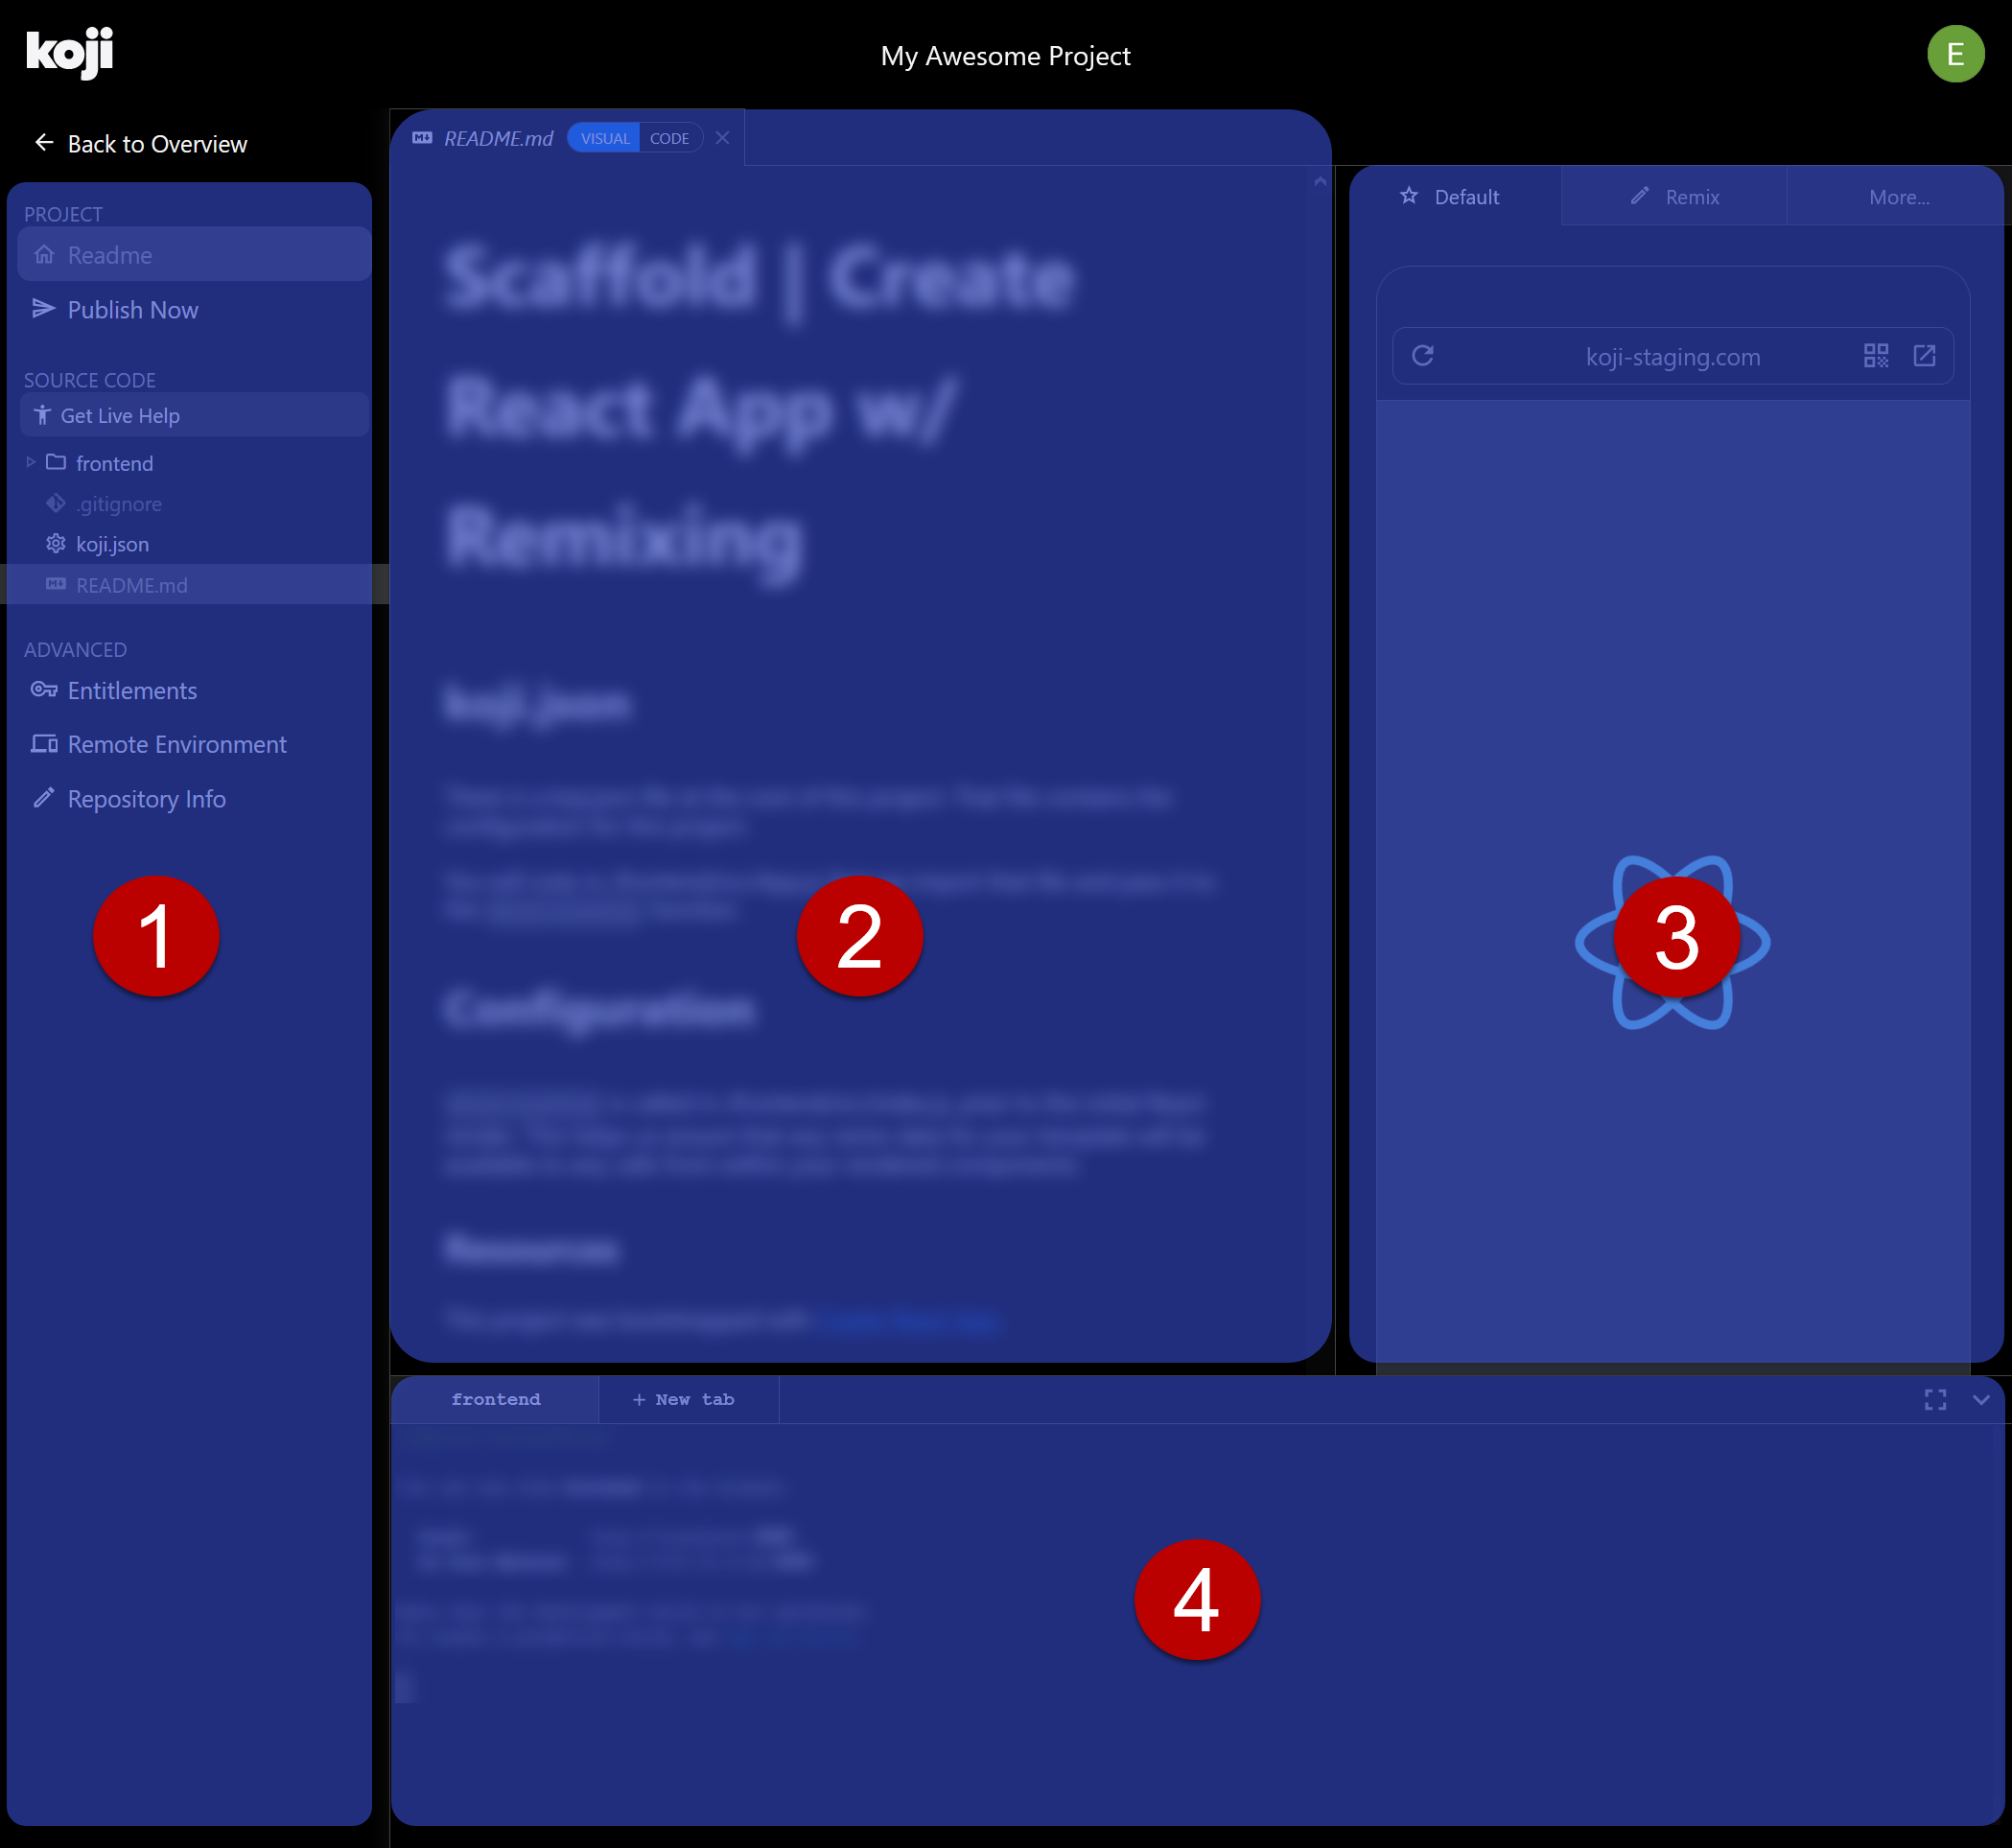
Exploring the code editor
The Koji code editor space is divided into these sections.
-
Navigation pane – Lists menu items and source code.
-
Editing pane – Displays open files. Supports multiple tabs.
-
Preview pane – Displays a live preview of the Koji app and provides other testing and debugging tools.
-
Terminal pane – Provides command-line access to the Koji app’s services. Supports multiple tabs and is initially collapsed.
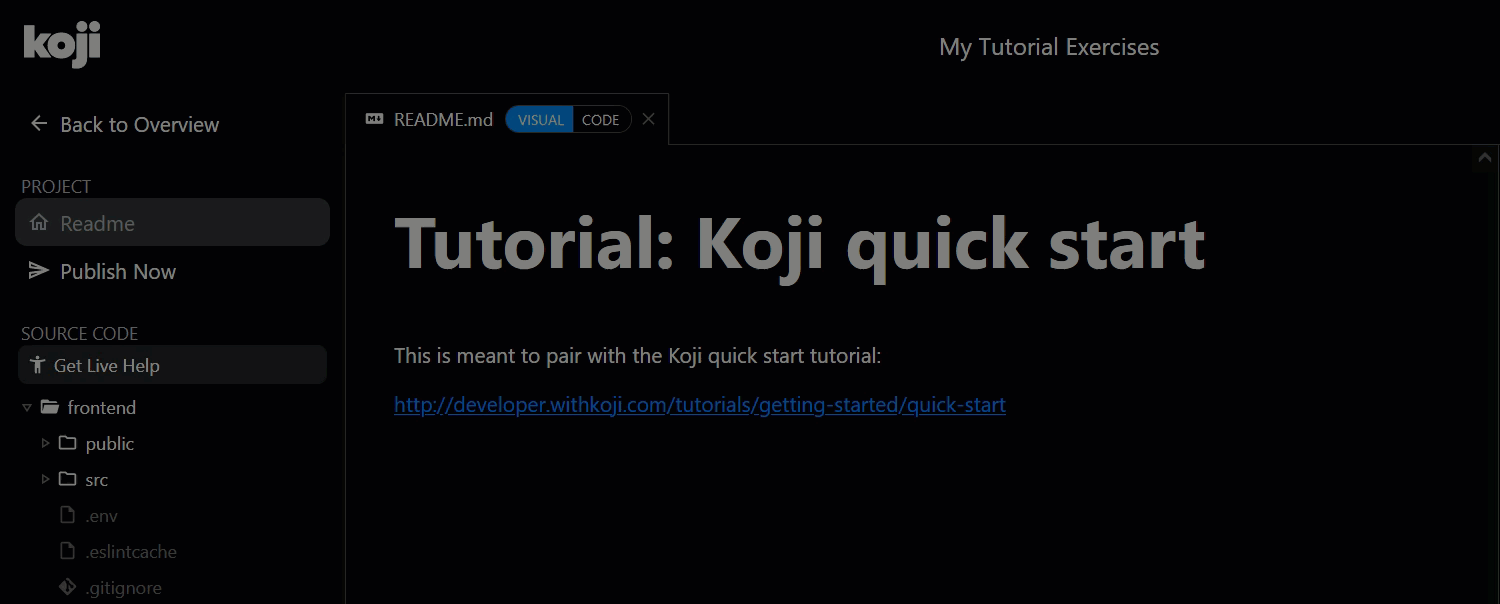
Exercise 1.4: Edit README.md
By default, the README.md tab is initially open in the code editor. If not, click the Readme link in the left navigation pane under Project.
-
On the tab for README.md, toggle to Code to edit the Markdown file.
-
Update the title of the readme to be the same as the new name of your project.
-
Click Save or press Ctrl+S or Cmd+S.
-
On the tab, toggle back to Visual to view how the readme would look with formatting.
The Save button appears whenever the file has unsaved changes.
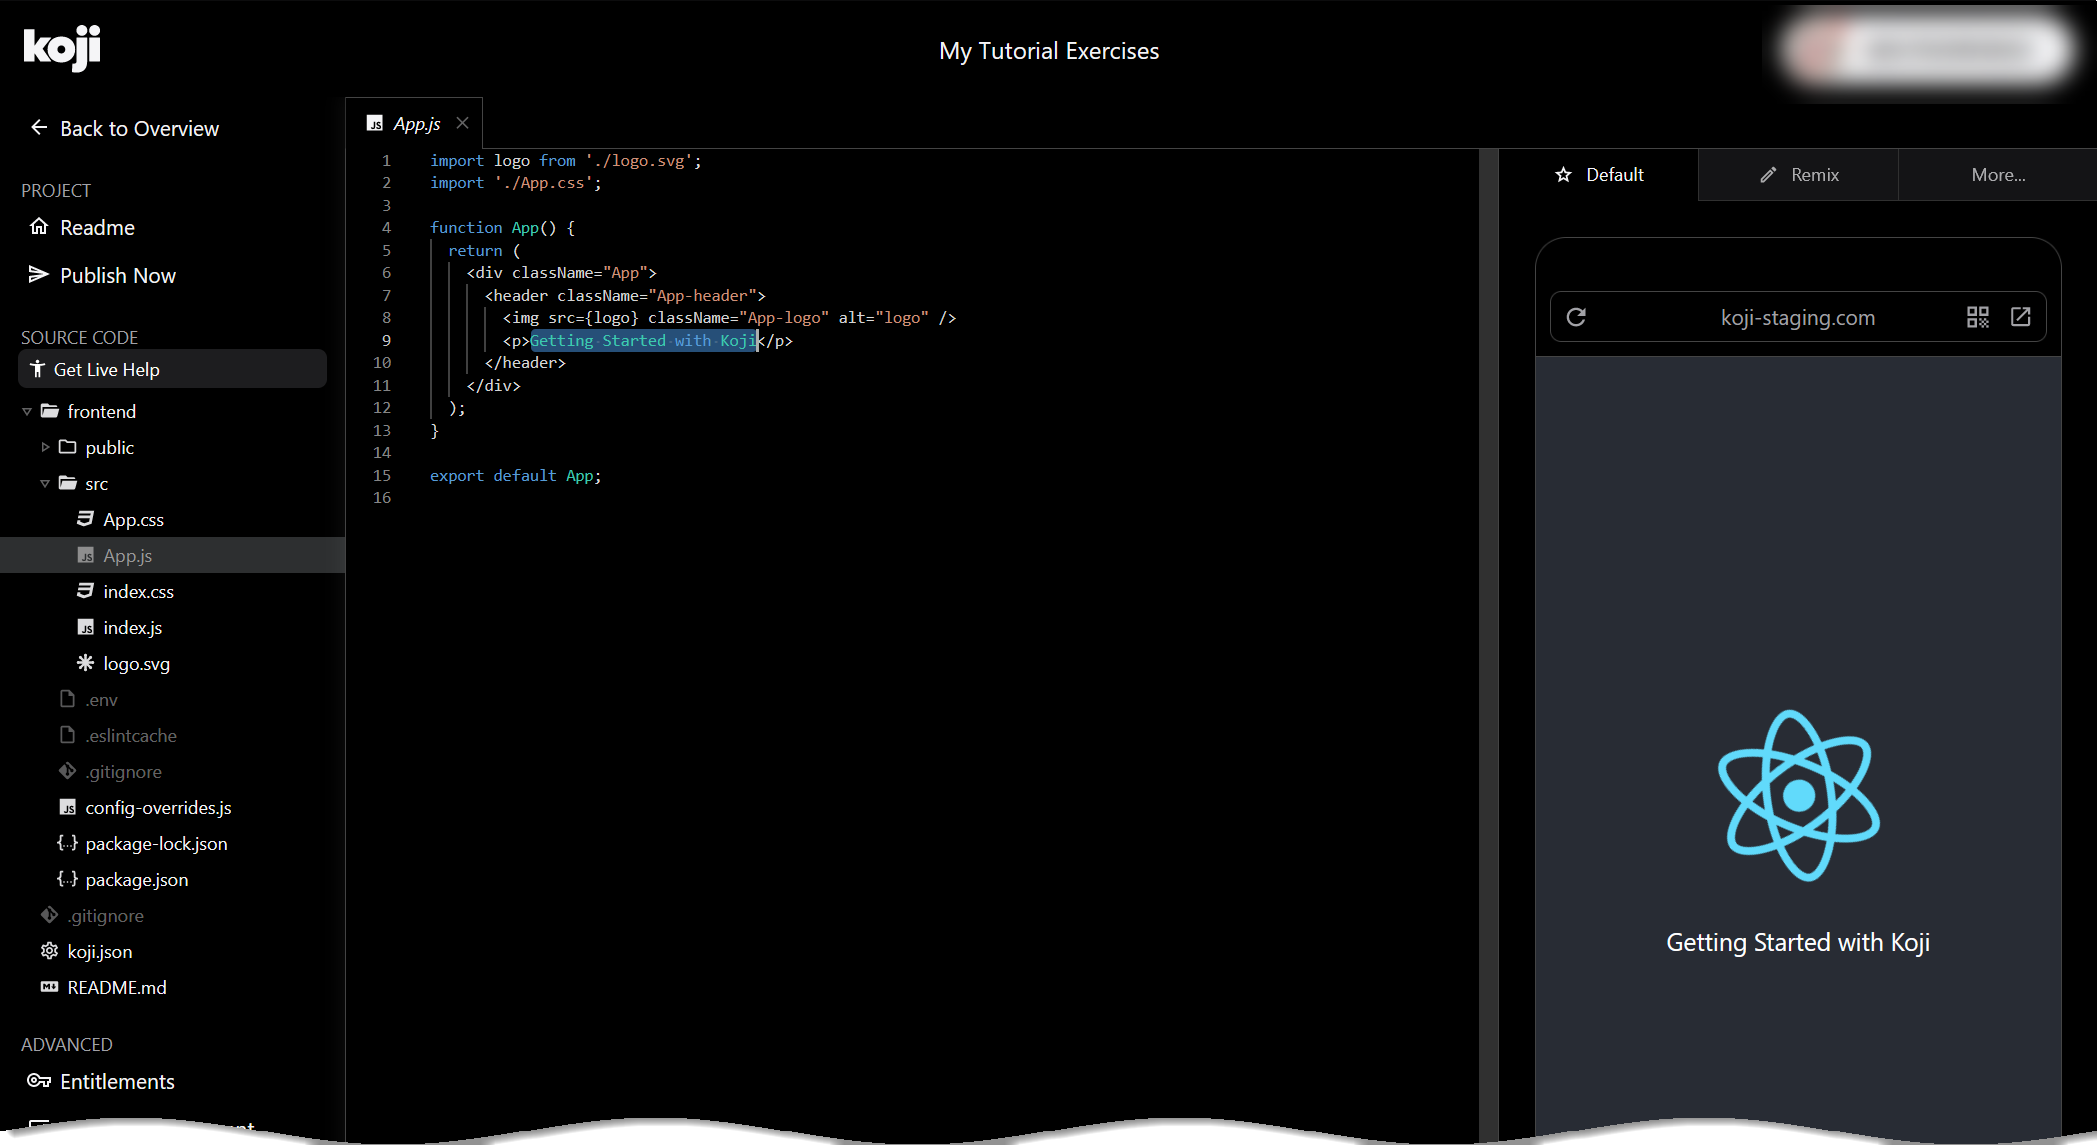
Exercise 1.5: Edit App.js
-
In the navigation pane, under Source Code, expand and click App.js.
In the editing pane, a new tab is created for App.js.
-
Replace the text that the app displays.
-
Search for the following line:
<p>Getting Started with Koji</p> -
Replace it with:
<p>Having Fun with Koji</p>
-
-
Click Save or press Ctrl+S or Cmd+S.
Notice that the preview pane is automatically updated with the new text.
|
Tip
|
To close a source file that is open in the editing pane, simply click the X icon on that file’s tab. |
Publishing your app
The preview displays only a temporary build of your app, which is hosted on a staging server. You can share the staging URL with your collaborators for testing and for getting feedback. However, this build and its associated URL become inaccessible after you close the code editor.
|
Tip
|
You can find the staging URL by clicking the remote preview icon ( ) near the top of the preview pane.
Then copy the URL from the browser’s address field. ) near the top of the preview pane.
Then copy the URL from the browser’s address field.
|
To release your completed app and obtain a permanent URL, you must publish it. When you do so, an optimized (release) build of your app is generated and then hosted in a production server.
You can share the permanent production URL of your app in email or other social media.
|
Note
|
Publishing your app does not automatically add it to the Koji App Store until you create a listing for it. |
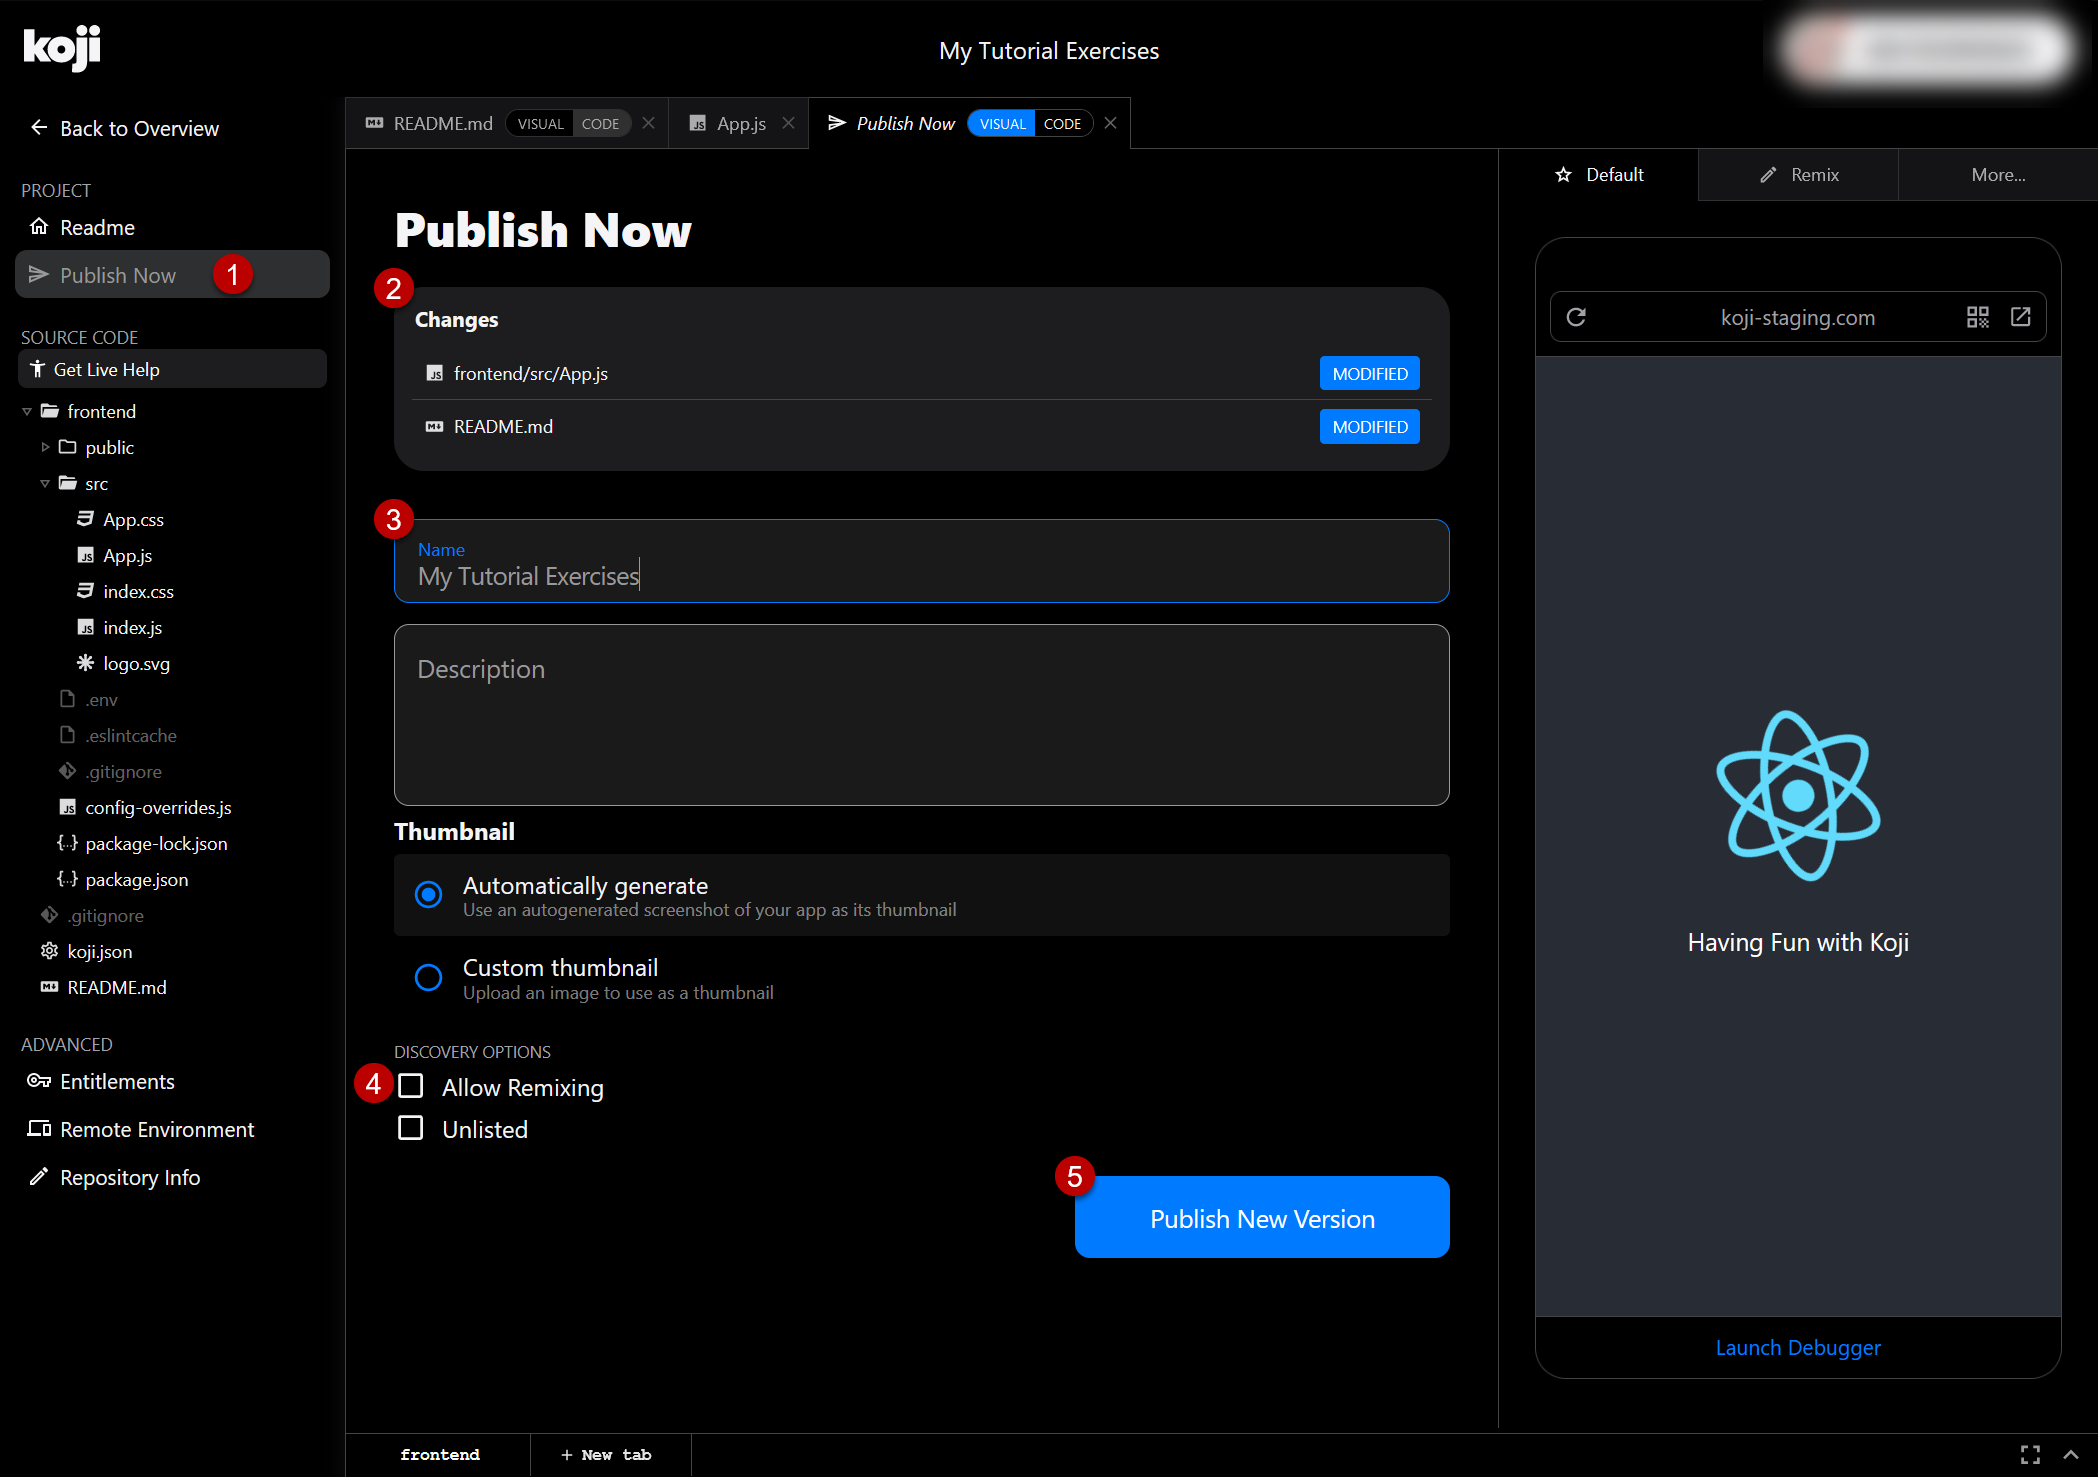
Exercise 1.6: Publish your app
|
Important
|
Before publishing, remember to save all changes in all the files that you edited. Unsaved changes will not be published and are lost when you close the code editor. |
-
From the navigation pane, click Publish Now.
-
Verify that the two files you modified are listed under Changes.
-
(Optional) Replace the default name and add a description.
-
(Optional) Select Allow Remixing to allow other developers to fork this project.
-
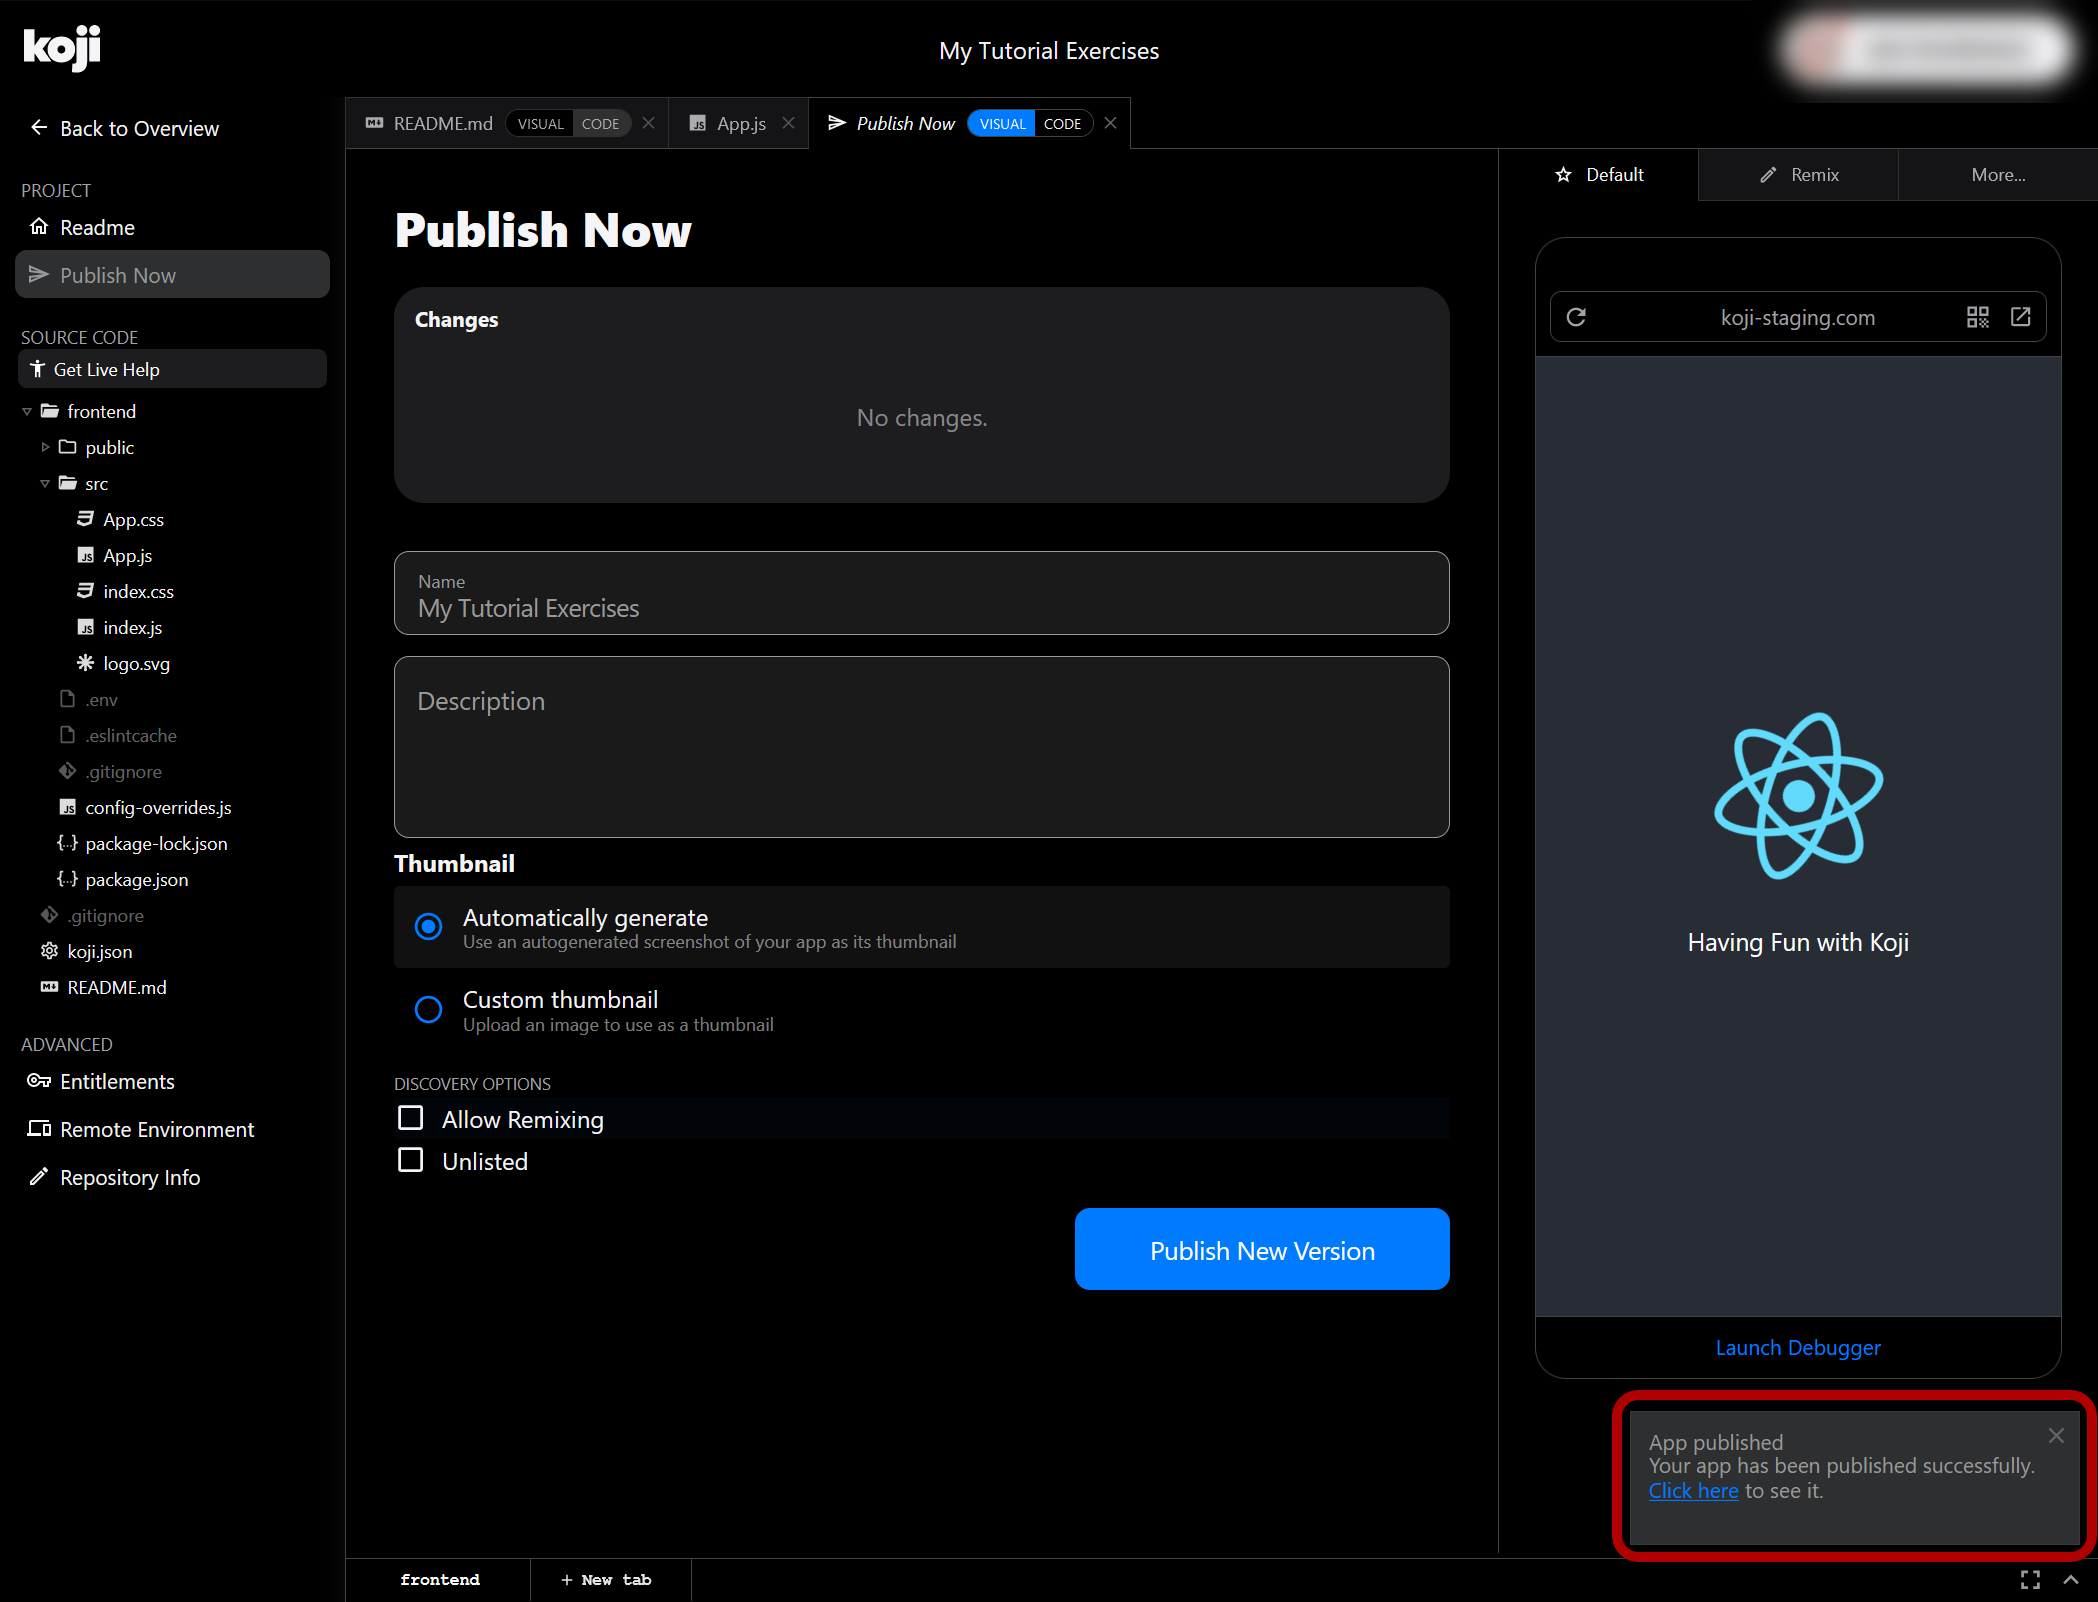
Click Publish New Version.
During the build, a progress bar is displayed at the bottom right.
After the build, the progress bar is replaced by a success notification, which includes a link to the permanent URL of your app. Future versions of your app will have the same URL.
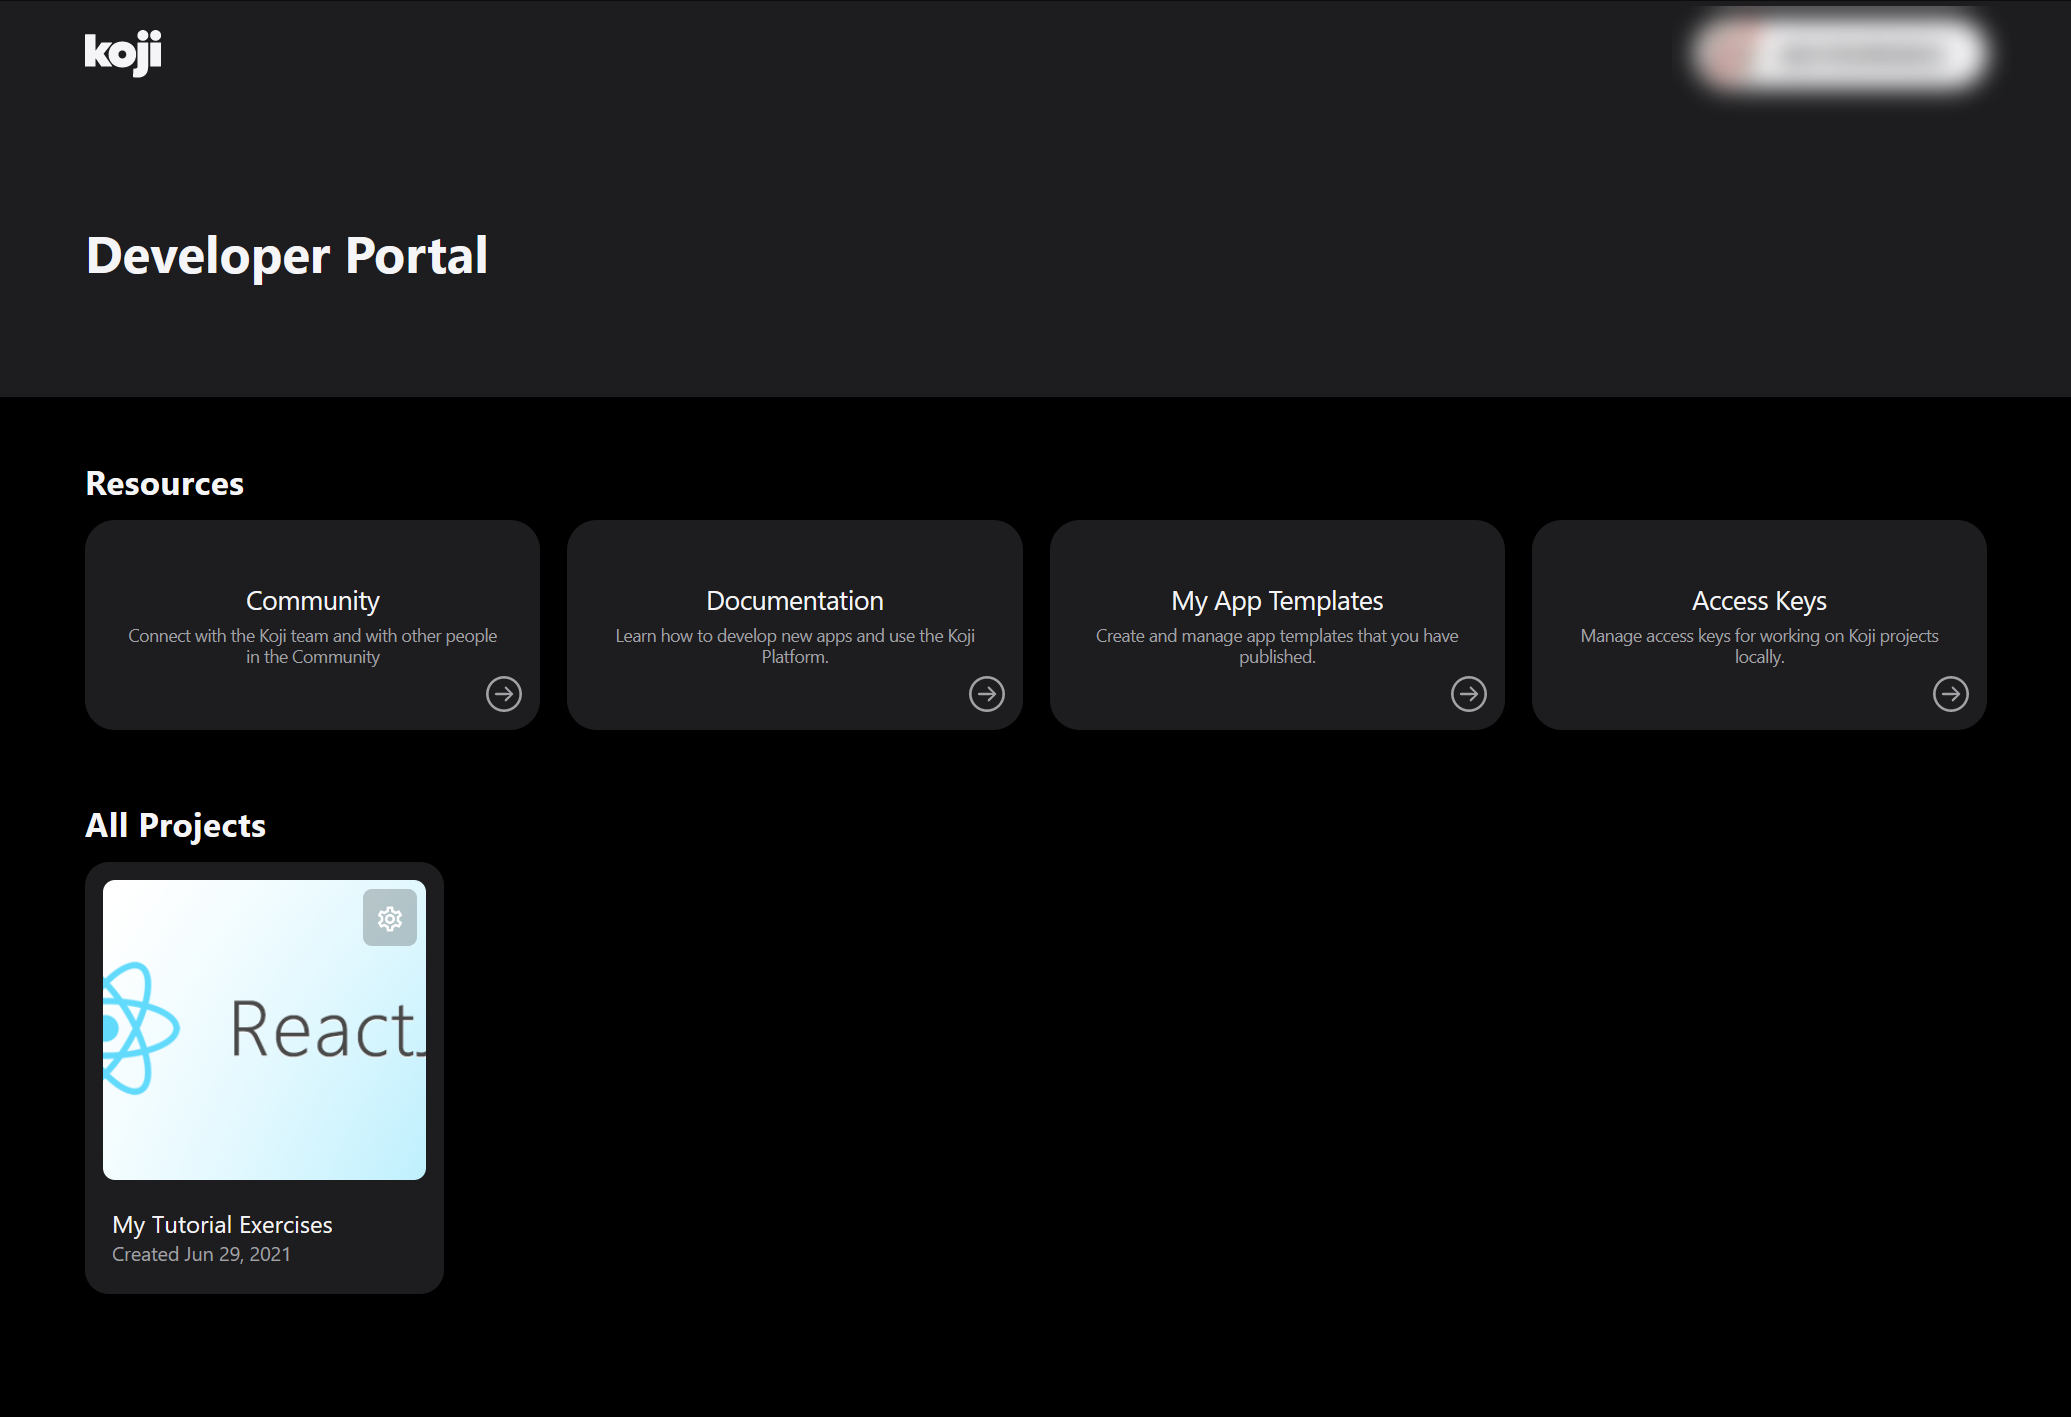
Your Developer Portal
All the projects you create are listed in your own Developer Portal, where you can open them again for editing.
Your Developer Portal also includes additional links:
-
Community – Many ways to connect with the Koji developer community.
-
Documentation – This documentation set.
-
My App Templates – The listings for apps that you added to the Koji App Store.
Learn more: app-store.html -
Access Keys – Security keys required to access your Koji project to work on it locally.
Learn more: local-development.html
Exercise 1.7: Reopen your project
-
Open a new browser window.
-
Go to your Developer Portal page.
-
Under All Projects, click the project that you created earlier.
The Project Details page opens. This is the same page where you renamed your project and opened the code editor.
Notice that the Deployment Status card now says "Version 1" and the Development Status card lists one version.
|
Note
|
Koji handles almost everything you need to deploy and host your app:
|
What’s next
Congratulations! You’ve successfully created and published your own Koji app! You’ve also seen some of the basic parts of the Project Details page, the code editor, and your Developer Portal.
In the next topic, you will learn how to incorporate the @withkoji/core package into your project and how to use it to easily add various features to your app.