Start typing to search...
Use Git to manage projects
Git is the version control system used by Koji. You use it to handle your projects and keep track of the changes to them. In the first section of this tutorial, you will clone a Koji project to your development machine, so that you can work on it locally.
Learning objectives
By the end of the section, you should feel comfortable:
-
Installing the tools required for working locally.
-
Locating the URL, username, and password that you’ll need to clone your project.
-
Cloning the Git repository for your project onto your local machine.
Prerequisites
To develop your Koji project locally, you need these tools:
-
The open-source Git version control system.
Koji stores each app and each forked project as a separate Git repository. To work on a project locally, you will use Git to download a clone of your project to your local machine. You can then make changes and use Git to push the changes back to the origin repository on the Koji servers.
This tutorial assumes that you already have Git installed on your computer, and that you are familiar with the basic Git commands. If you need to install Git on your computer, follow the instructions in the Git documentation.
-
The open-source Node.js server environment.
Koji uses Node.js and many add-on packages to deliver your web application to your users' browsers. You will need to install Node.js and its associated Node Package Manager (NPM) to run a Node server on your development computer.
-
A terminal application.
You will be typing commands that use git and npm to set up your development environment. Depending on your operating system, the application you use will be different. Here are some suggestions:
-
Terminal on macOS
-
GitBash on Windows
-
Linux Terminal on Linux
-
-
A text editor.
You will use a text editor to edit your code, and save it as plain-text files. A text editor that is designed for writing code can help you in many ways, such as verifying structure and syntax or finding the correct variables or function names. For more information, see this list of recommended text editors, which includes several that are excellent and free.
Choosing an app for your project
This tutorial uses the Falling Objects app as an example because it illustrates a completed game with code that runs both on the backend and on the frontend. However, the instructions in this tutorial apply to any Koji project. You can start a Koji project by forking any other app on Koji. For some great starting points, check out the For Developers section of the Koji App Store.
-
Go to the Falling Objects app.
-
Click .
After a short loading time, the Project Details page opens.
Cloning the Git repository
When you fork a project, Koji creates a new fork of the project’s Git repository for you.
This new repository has a unique identifier string.
If you fork the same project twice, you will get a different identifier string each time.
The Koji repositories are stored at
https://projects.koji-cdn.com/.
To clone your Koji repository locally, you need these strings:
-
The username that you created when you registered with Koji.
-
An access token, which you must generate and store securely.
The access token is a 32-character randomly-generated hexadecimal number, which you can use instead of a password when cloning your repositories.
-
The values of the
KOJI_PROJECT_IDandKOJI_PROJECT_TOKENenvironment variables, if the project has a backend component. -
The values of the
KOJI_CREATOR_USERNAMEandKOJI_CREATOR_PROFILE_PICTUREenvironment variables, if you want to use platform-provided metadata about the creator in the project.
Obtaining an access key
To clone your Koji repository locally, you must generate an access key and store it securely. Access keys are strong, randomly-generated, 32-character hexadecimal strings that you generate to allow programmatic access to your Koji projects.
-
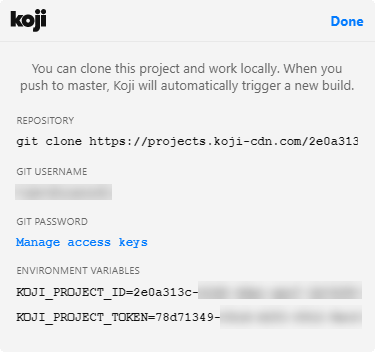
From Project Details, click Clone. A dialog similar to the following opens.
-
Click Manage access keys. The Access Keys page opens in a new tab.
-
Click Generate new token in the top right.
A window opens to display the new access key.
-
Copy the access key and keep it somewhere safe, where only you can find it.
You will need to use this key each time you clone, pull, or push to the origin repository.
WarningAfter you close the window, the access key will be displayed only by name (for example, Token 1). You will not be able to retrieve it from the Koji site again. You can, however, revoke your token and generate a new one if you have forgotten it, or if you believe that someone unauthorized has discovered it.
Obtaining Koji environment variables
The Koji platform reads in project details from environment variables to ensure that the deployment data is kept separate from the code and configuration for your app.
If your project has a backend, you need the values of the KOJI_PROJECT_ID and KOJI_PROJECT_TOKEN environment variables to access it.
Additional environment variables are available for accessing platform-provided metadata about the Koji’s creator.
-
If the Clone dialog is not already open, return to the browser tab for Project Details, and click Clone.
The first line of text under Environment Variables is the project ID.
-
Click the line to highlight it.
-
Copy the highlighted line and paste it somewhere to save it for later.
-
Do the same with the second line of text, which is the project token.
-
Repeat for the next two lines, which provide metadata about the creator.
Authorizing Git to clone the repository
-
If the Clone dialog is not already open, return to the browser tab for Project Details, and click Clone.
-
Click the line of text under Repository in the dialog box to highlight it. This line has the form
git clone https://projects.koji-cdn.com/[unique identifier].git, where [unique identifier] is the identifier for the repository directory onhttps://projects.koji-cdn.com/. -
Copy the highlighted line to the clipboard.
-
Open a terminal window, and go to the directory on your local machine where you want to save your project.
-
Paste the line you copied to the clipboard.
-
Append a space followed by a name for the directory that you want Git to create for your project. The line should have the following format:
git clone [repository URL] [directory name] -
Press Enter to run the command. Your terminal will look something like this:
~/Repos/Koji$ git clone https://projects.koji-cdn.com/a70f8329-e89e-48b0-8d85-7658c1542b9f.git MyKojiApp Cloning into 'MyKojiApp'... Username for 'https://projects.koji-cdn.com': -
If you are prompted for your username, enter your username on Koji and press Enter.
-
If you are prompted for a password, enter the access key that you generated in the previous procedure.
For security, the password will not be shown as you enter it.
-
Press Enter to start the cloning process.
Your terminal will look something like this:
~/Repos/Koji$ git clone https://projects.koji-cdn.com/a70f8329-e89e-48b0-8d85-7658c1542b9f.git MyKojiApp (1) Cloning into 'MyKojiApp'... Username for 'https://projects.koji-cdn.com': KojiCoder (2) Password for 'https://KojiCoder@projects.koji-cdn.com': (3) remote: Counting objects: 15941, done. remote: Compressing objects: 100% (6156/6156), done. remote: Total 15941 (delta 9517), reused 15941 (delta 9517) Receiving objects: 100% (15941/15941), 9.35 MiB | 754.00 KiB/s, done. Resolving deltas: 100% (9517/9517), done. Checking connectivity... done.-
Your repository URL and local directory
-
Your Koji username
-
Your access key
-
Confirming your local directory
You should now have a new directory on your local machine that contains downloaded files from the origin repository.
To confirm that the project has been cloned correctly:
-
Open a terminal window, and go to the directory that you specified when you cloned the repository.
-
List the directory contents.
Your terminal should look something like this:
~/Repos/Koji$ cd MyKojiApp/
~/Repos/Koji$ ls -al
total 40
drwxrwxr-x  6 kojicoder dev 4096 nov  5 16:38 .
drwxrwxr-x 11 kojicoder dev 4096 nov  5 17:00 ..
drwxrwxr-x  3 kojicoder dev 4096 nov  5 16:38 backend
-rw-rw-r--  1 kojicoder dev  516 nov  5 16:38 Dockerfile
drwxrwxr-x  5 kojicoder dev 4096 nov  5 16:38 frontend
drwxrwxr-x  8 kojicoder dev 4096 nov  5 16:38 .git
-rw-rw-r--  1 kojicoder dev  186 nov  5 16:38 .gitignore
drwxrwxr-x  6 kojicoder dev 4096 nov  5 16:38 koji.json
-rw-rw-r--  1 kojicoder dev   27 nov  5 16:38 package-lock.json
-rw-rw-r--  1 kojicoder dev  797 nov  5 16:38 README.md
Wrapping up
In this part of the tutorial, you learned how to:
-
Get the required tools: Git, Node.js, a terminal application and a text editor.
-
Get the URL of Koji’s origin repository for your project.
-
Get the username and password that allows you to interact with Koji’s origin repository.
-
Clone the Git repository for your project onto your local machine.
Before you can launch your project locally, you must install a set of Node module dependencies. For more information, see work-locally.html.