
Start typing to search...
Add customization options
In the previous section of the in-game purchases tutorial, you modified the game’s original behavior to reflect the new payment flow. In this section, you’ll give creators the ability to set the price of extra lives when they customize the game.
By the end of this section, you should feel comfortable:
-
Modifying the
Remixcomponent. -
Setting up the price input field.
-
Making sure the price value is updated correctly.
Installing npm packages
For the price input field, this tutorial uses a pre-made component in the @anderjason/koji-react-frontend-tools package along with functions in the @anderjason/money package. Together, they handle the proper formatting and validation for price inputs, so you don’t have to worry about the user entering invalid characters, incorrect price formats, or other invalid data.
The @anderjason/koji-react-frontend-tools package is already installed in the base game scaffold. You will need to install the @anderjason/money package in the frontend of your game.
At the bottom of the Koji editor, open the frontend terminal.
In the terminal, press Ctrl+C to stop the server.
Type npm install @anderjason/money, and press Enter.
When the installation has finished, type npm start to restart the frontend server.
Adding the price input field
In frontend/src/Components/Remix/index.js, add a state hook for the price, initialize its value, and set a maxPrice constant (to make sure users can’t abuse anything).
// Don't forget the imports!
import { Money, Currency } from "@anderjason/money";

...

const maxPrice = new Money(100000, Currency.ofUSD());

const Component = () => {
    ...
    const [price, setPrice] = useState(new Money(1, Currency.ofUSD()));

    ...

    useEffect(() => {
        const remixValues = Koji.remix.get();
        ...

        // Make sure we get a number
        // Multiplied by 100 because Currency uses that format
        const remixPrice = Number(remixValues.price) * 100;
        setPrice(new Money(remixPrice, Currency.ofUSD()));

        ...
    }, [])
}
Next, render the MoneyInput in the Card component, just below the Section that contains the block image.
// Don't forget the imports!
import { MoneyInput } from "@anderjason/koji-react-frontend-tools";

...
<Card>
    ...

    <ImageButton
        onClick={() => changeBlock()}
        onDelete={() => deleteBlock()}
        canDelete={canUpdateImages}
        src={block}
        isInvalid={isBlockInvalid}
    />
    <MoneyInput
        placeholderLabel="Price To Refill Lives"
        persistentLabel="Price To Refill Lives"
        defaultValue={price}
        maxValue={maxPrice}
        onChange={(price) => setPrice(price)}
        allowEmpty
        supportLabel={price && price.rawValue > 0 ? 'Set price to 0 to disable In-Game Purchases.' : 'In-Game Purchases disabled.'}
    />

    ...
</Card>
Note that if the price is empty or 0, the supportLabel is set to In-Game Purchases disabled.
Otherwise, it’s set to Set price to 0 to disable In-Game Purchases.
Updating the price value
Finally, you need to update the changed price in the customization data.
Find the onFinish() function and add the following property in await Koji.remix.set({…}).
price: price ? price.rawValue / 100 : 0
Here, you’re running a check to make sure you don’t write a null value into koji.json, in which case you substitute 0.
The resulting onFinish() function should look like this code.
const onFinish = async () => {
    if (block === "") {
        setError("Complete the required selections to continue.");

        if (block === "") {
            setIsBlockInvalid(true);
        }

        return;
    }

    await Koji.remix.set({
        backgroundImage,
        music,
        title,
        collectEmails,
        imgBlock: block,
        price: price ? price.rawValue / 100 : 0,
    })

    Koji.remix.finish();
}
Your customization menu should now look like this.
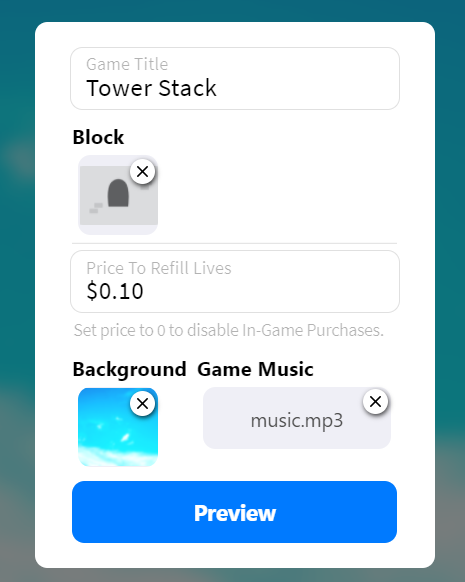
Go ahead and give it a spin!
Wrapping up
In this section, you’ve made the price customizable and, with that, concluded this tutorial. All that’s left to do is to publish the game from the Publish Now menu and share it everywhere online!
Of course, the game is now your playground. You can go back to modify or add new features, make improvements, or anything else you can imagine.
If you have any questions or feedback about this tutorial, please reach out to @Marko(Svarog) and the Koji community on the Koji Discord server.