= Koji for Developers

Create your own https://withkoji.com[Koji apps].

== Use any framework

* React
* Vanilla JS

[source,javascript]
console.log('Hello World');Start typing to search...
Contribute to the developer site
The Koji for Developers documentation site is built and maintained by developers just like you. You too can help by contributing to the site structure, writing new articles, or suggesting edits to existing documentation.
Anyone can open an issue about documentation, or contribute a change with a pull request to the madewithkoji/docs GitHub repository.
|
Tip
|
If you have thoughts, questions, or feedback, please reach out to the developer community or the @Koji-Team on our Discord server.
|
Editing the documentation
The documentation is written in Asciidoc, which is a lightweight markup language for simplifying the creation of documentation.
All the AsciiDoc files that map to this site can be found in the repository under src/asciidoc/.
Here’s a quick example:
To see more examples and get a better understanding of the syntax, visit the AsciiDoc cheatsheet and the AsciiDoc Syntax Quick Reference.
|
Tip
|
To test how your documentation changes will look on the site, clone the GitHub repository locally and run gatsby develop in the root directory.
|
We have also extended the AsciiDoc syntax to make the developer site ever better.
Page attributes
Page attributes are used to add extra data related to a document. Add these to the top of your document, just under the document title.
- Page slug
-
Corresponds to the page URL and is used for linking between different pages (see Documentation structure).
:page-slug: example-page - Page description
-
Provides a short description of the content of the page and is used when sharing the link on social media and chat platforms.
:page-description: This page is an example - Page banner
-
References an image, which is used as the thumbnail when sharing the link on social media and chat platforms.
:page-banner: {imagesDir}/example-page.png
|
Note
|
|
Tabs
Sometimes it can be useful to sort your content into tabs. You’ll see them used particularly often to display code snippets for differing frameworks. To add tabs into your document use the following syntax:
[.tabs]
--

.Tab 1 title
Tab 1 content.

.Tab 2 title
Tab 2 content.

--
The above code will output the following:
Tab 1 title
Tab 2 title
Tab 1 title
Tab 1 content.
Tab 2 title
Tab 2 content.
You might also notice that on some pages changing tabs will switch the tabs in multiple places (for example, when choosing a coding framework for an article).
To sync multiple sets of tabs, use the scope attribute. Then, selecting a tab on the page also selects any other tabs with the same scope and a matching tab title.
[.tabs,scope="lang"]
--

.React
Some react code

.Vanilla JS
Some Vanilla JS code

--

[.tabs,scope="lang"]
--

.React
Some more react code. These tabs will sync with the above ones.

.Vanilla JS
Some more Vanilla JS code. These tabs will sync with the above ones.

--
React
Vanilla JS
React
Some react code
Vanilla JS
Some Vanilla JS code
React
Vanilla JS
React
Some more react code. These tabs will sync with the above ones.
Vanilla JS
Some more Vanilla JS code. These tabs will sync with the above ones.
Documentation structure
Understanding the file structure of the documentation is helpful when making modifications.
While all the documentation is structured as per the site under src/asciidoc/ there are two other file structures to understand that will help you build content:
- nav.json
-
The site navigation is defined in the
src/nav.jsonfile. Thenameandslugattributes define where a page is listed in the sidebar as well as the URL structure. - _includes/
-
It can be useful to write documentation snippets and code blocks in external files so that they can be reused across multiple pages. These are stored in
src/asciidoc/docs/_includes/and can be included in any other documentation using the asciidoc syntaxinclude::file_name.
Upgrading the site
You can also contribute by making improvements to how the developer site runs. The developer site is built using Gatsby, Asciidoctor.js and the gatsby asciidoc transformer.
Download the GitHub repository, run npm install to install all the dependencies, then start your development server by running either npm start or gatsby develop.
You can also run a build and local serve to test how the site will be rendered in production using gatsby build && gatsby serve.
Submitting your contributions
As the source code for this site is available on GitHub you can make a contribution by creating a pull request to the repository. To do so you will need to complete the following steps:
-
Make your changes.
Once you have created your pull request it will need to go through some checks before it’s added to the Koji for Developers site.
Build test
First off a Travis CI will run a test build to ensure there are no errors. This step is automatic and will run shortly after you’ve created your pull request. After a few minutes, if nothing went wrong, you should see a green check mark against the second item in the branch action section of you pull request.
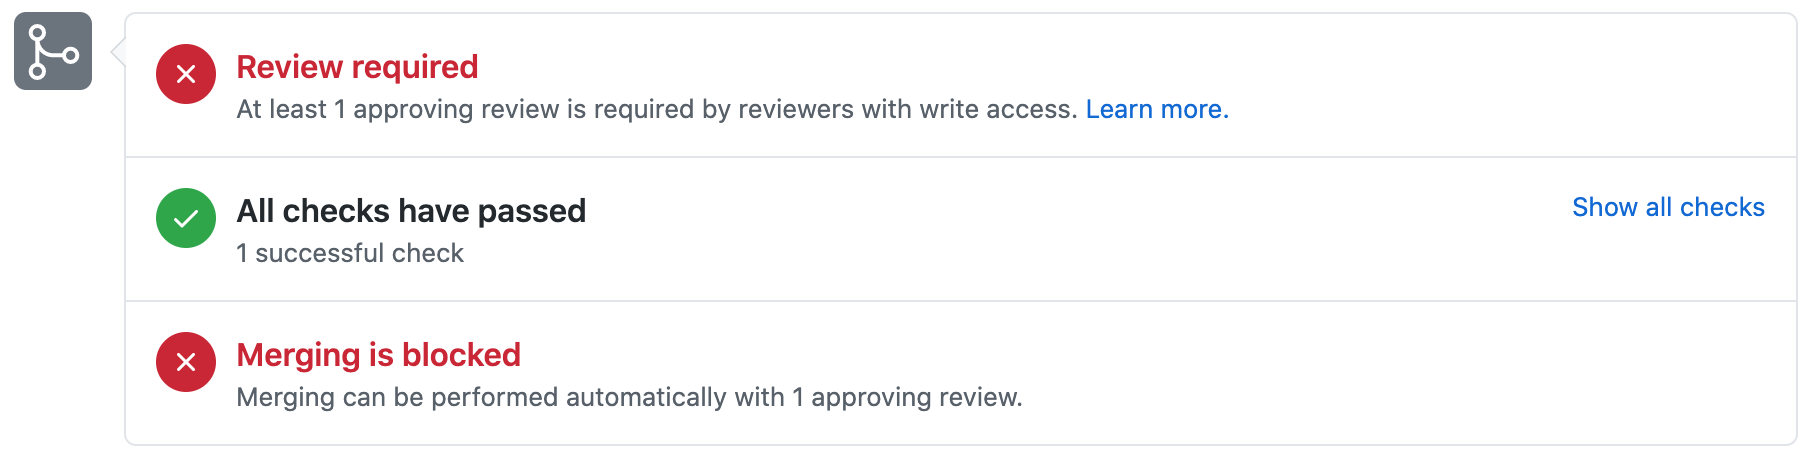
However, if the build didn’t pass you will need to troubleshoot what went wrong. You can run the same build process on your local branch by running:
gatsby buildOnce you’ve resolved the issue, push your new commits to the same branch and the pull request will re-run the build test.
Manual Review
After the build test has passed someone from the Koji team will need to review your pull request before it can be merged. The team may request you make some small changes or add other suggestions. Once you’ve addressed any feedback from the review push your code changes to the same branch and the team will re-review your the pull request.