Start typing to search...
Docs
Publishing and maintaining templates
Managing template versions
Search
Managing template versions
After you publish a template on Koji, you might want to update it to increase its value. For example, you might add new features or fix bugs reported by testers or remixers.
The Koji platform provides several options to help you manage the update and maintenance strategy for your templates. You can update the template code and republish the project, which replaces the existing template with a new version. Alternatively, you can decide to fork the code base and publish it as a new template. If you update a template to a new version, you can decide how to handle instant remixes of Kojis that are based on older versions.
Updating vs. forking a template
When you’re planning to make changes to your template, you must decide whether to update it to a new version or fork it and create a new template. There are several factors to consider, including the scope of the changes and the compatibility of the Visual Customization Control (VCC) data.
To update a template to a new version, you modify the code and republish the project. The new version replaces the older version at the same URL. A creator who remixes your template from the base URL can now take advantage of its latest features and fixes.
However, a creator can still remix a Koji that was created from an older version of your template. To handle this case, you can configure the project settings so that instant remixes always use the latest version of the template. For the remix experience to work the way the user expects, the template must be able to support the custom values from the older Koji, and any new features must have reasonable default values. If the VCC structure has changed between versions, you might be able to apply an upgrade function to transform the custom values from the old format to the new format.
If the VCC structure has changed to the extent that the values can’t be transformed in a reasonable way, or if the changes would fundamentally change how the template is used, you can consider forking the code base and creating a new template. For example, you might fork the code base to integrate a new feature on the Koji platform or to support a different use case than the original template.
|
Tip
|
For a digest of the latest changes and new features in the Koji platform and developer packages, see the developer-updates.html. |
When forking a code base, keep in mind that creators can still remix any Kojis made with the original project, and those remixes will also use the original project code. That means, creators will continue to use the original template, and could get confused or frustrated if it doesn’t work as expected. Therefore, you might want to continue support for the original project with updates and fixes, as needed.
Viewing version history
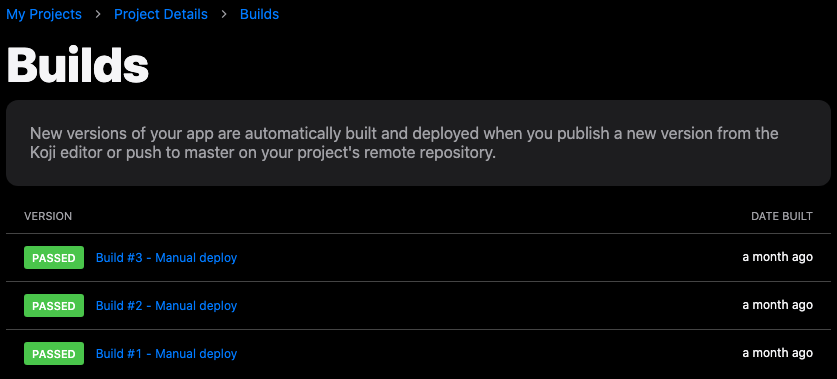
Each time you publish a project, a new version of the template replaces the existing version at the same URL.
To view the version history for your template, go to Developer Portal > My projects and click the project. Then, click Build History on the project overview page. Click any build version to view or download the logs.
|
Tip
|
If you are working locally and pushing updates to Koji with git, you can use this view to verify that your latest build was deployed. |
Managing instant remix versions
If your template supports instant remixing, you can manage which version of the base template an instant remix will use. By default, an instant remix uses the same template version as the Koji that is remixed, even if the Koji was created with an older version. You can configure your project so that all remixes use the current version, regardless of which version was used to create the Koji. This setting ensures that new remixes can take advantage of the latest features and fixes in your template as it continues to evolve and improve.
|
Tip
|
Edits to an existing Koji always use the source version, regardless of the instant remix settings. |
-
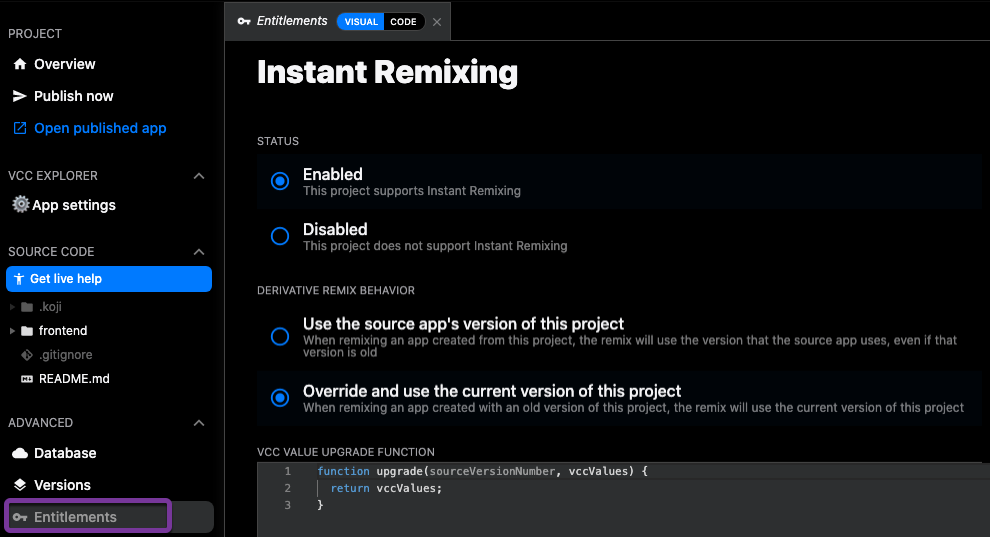
In the Koji editor, go to Advanced > Entitlements.
-
Click InstantRemixing.
-
Select the desired remix behavior:
-
Use the source version (default)
-
Override and use the current version of this project
-
-
If you are overriding the source version and the JSON customization file has changed between versions, use the VCC value upgrade function to transform the custom values from the old JSON format to the new format.
-
If you used the VCC value upgrade function, test the transformation with different versions.
-
Click Save.
Transforming VCC values
If the structure of your VCC files has changed between versions, you might need to transform the custom values in the source Koji to make them work with the current version of your project. You can use the VCC value upgrade function to perform this transformation.
Input parameters
The upgrade function is executed at remix time by a short-lived virtual machine on the Koji server. It receives the following parameters as input:
-
sourceVersionNumber– Integer, version number of the VCC JSON that created the source Koji. Use this value to determine the structure of the values that need to be transformed. -
vccValues– Object, custom values from the source Koji.
Return value
The function must return an object containing the transformed values in under 500ms. The format of the return object must be compatible with the format of the current VCC JSON files.
If the transformation doesn’t work, you can throw an error and the remix will fall back to the default behavior. That is, it will use the source version of the template instead of the current version.
Example
For the following example, assume the title field is nested in the titleOptions object in the latest version, but it was not nested in the initial version of the template.
function upgrade(sourceVersionNumber, vccValues) {
  if (sourceVersionNumber === 1) { (1)
    vccValues.settings.titleOptions = {"title" : vccValues.settings.title};
    delete vccValues.settings.title;
  }
  if (sourceVersionNumber === 0){
    throw new Error('unsupported'); (2)
  }
  return vccValues; (3)
}-
Transform values from the old JSON format to the new format.
-
Throw an error to fall back to the default behavior for unsupported cases.
-
Return the transformed values.
Testing transformations
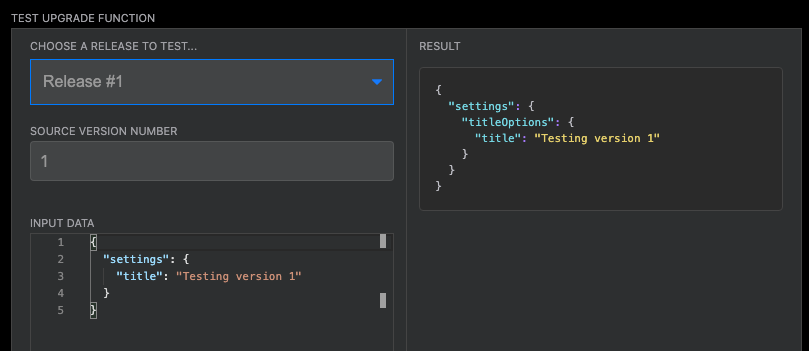
After you enter a VCC value upgrade function, you can test it with different versions of your JSON data.
-
Select the version you want to test.
The Input data is automatically populated with the default JSON data from that version.
NoteIf the test input data is not working as expected, try performing a hard rebuild of the project to fix the error. In the editor, go to Advanced > Remote environment, and then click Hard reset project. -
Click Test.
The upgrade function is run against the test input data, and the results are displayed in the right pane.
-
As needed, edit the upgrade function and retest it until the results match the desired format.
-
Repeat the test process for different versions, as needed.